
🚚 Free Shipping (3-5 Business Days) | 🛡️ 30-Day Money-Back Guarantee | 🏆 6-Month Warranty | ⭐ Trusted by 1000+ Happy Customers
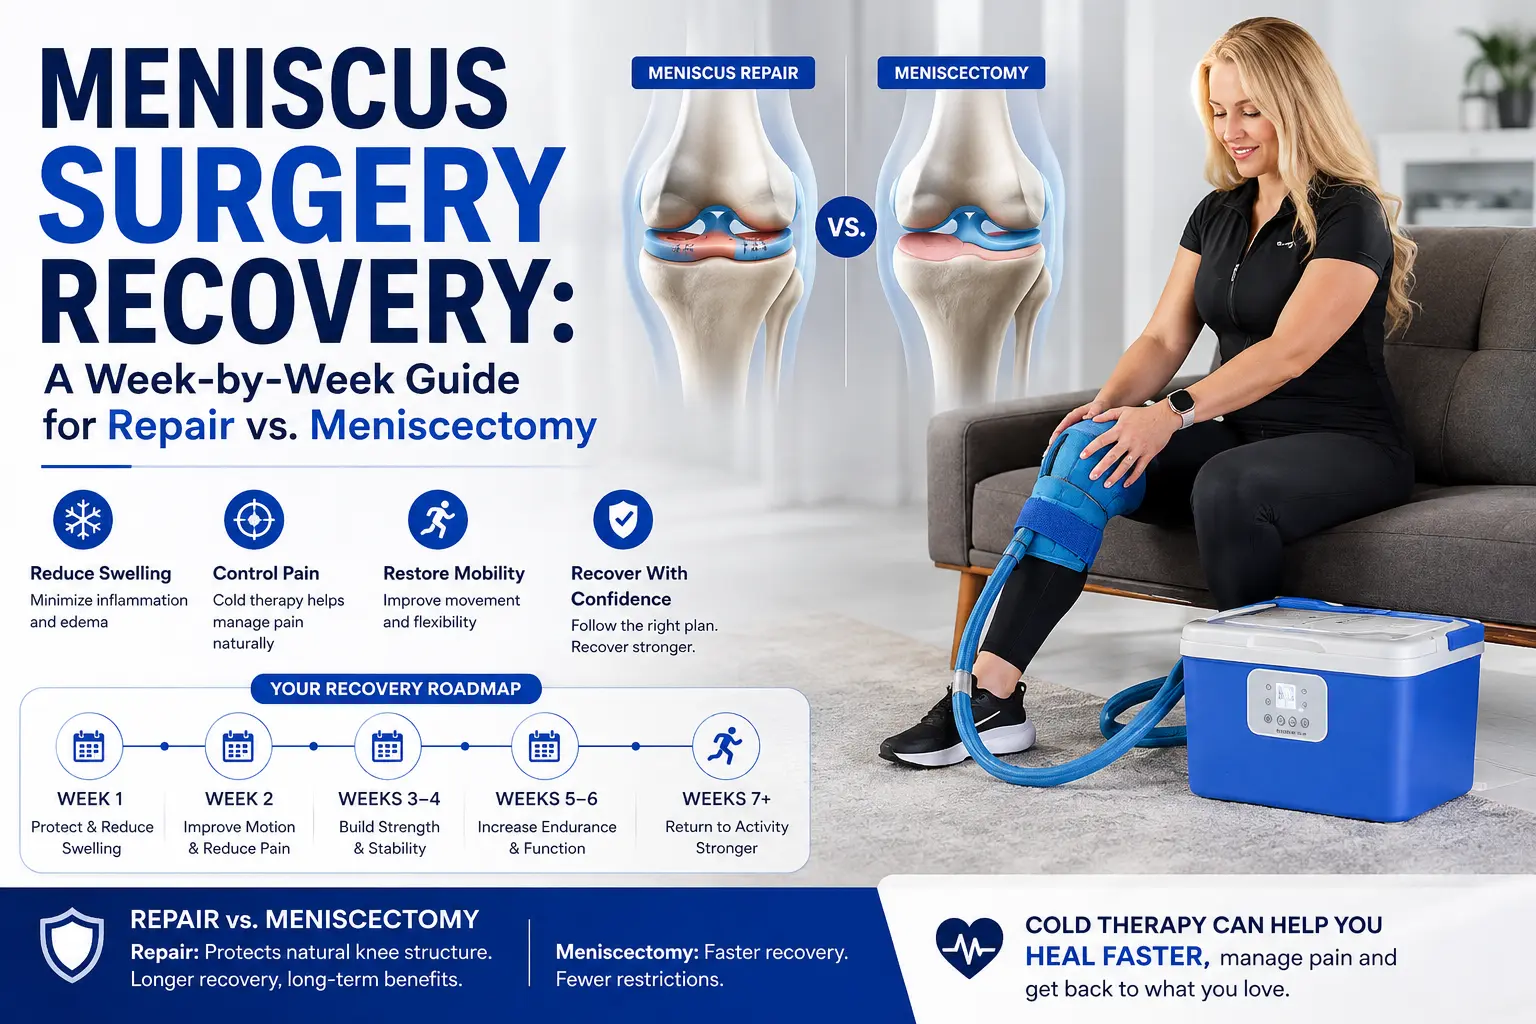

Meniscus Surgery Recovery: A Week-by-Week Guide for Repair vs. Meniscectomy
You wake up from surgery and the first thought is: When will I be normal again? Online forums offer a dozen different answers and your surgeon’s instructions might not match what your physical therapist says. That confusion is real and it feeds the anxiety. This guide cuts through the noise with a week-by-week roadmap that compares two distinct recovery paths, repair and meniscectomy, so you can see exactly what lies ahead, physically and mentally.
Key Takeaways
- Your recovery timeline splits sharply based on whether you had a repair or meniscectomy. Confirm your surgery type.
- The first two weeks are about protection and swelling control pushing too hard can undo a repair.
- Pain management works best when you stay ahead of it not when you chase it.
- Mental and emotional recovery is as real as physical healing. Expect ups and downs.
- Return to sport requires passing functional tests not just time.
I used to hand every patient the same generic recovery sheet until a repair patient limped back at week three with a hot, swollen knee. That’s when I scrapped the one-size-fits-all approach and built separate timelines. That’s why this guide gives you two distinct paths, so you know what to expect based on your surgery. First, let’s clarify the single biggest factor shaping your recovery the type of surgery you had.
Understanding Meniscus Surgery: Repair vs. Meniscectomy
Before you can follow a timeline, you need to know which path you’re on. A repair stitches the torn meniscus back together, preserving the shock absorber a meniscectomy trims away the damaged portion. Most patient guides skip the one detail that actually predicts your recovery the zone of the tear. We learned this when we started using the AAOS guideline: it’s the real differentiator.
Repairs are for outer, blood-rich zone tears meniscectomy for inner, avascular ones. This distinction dictates weight-bearing repair often means around 4 to 6 weeks non-weight-bearing, while meniscectomy allows walking within days. Your surgeon’s protocol is your primary guide. Knowing your surgery empowers you to ask the right questions.
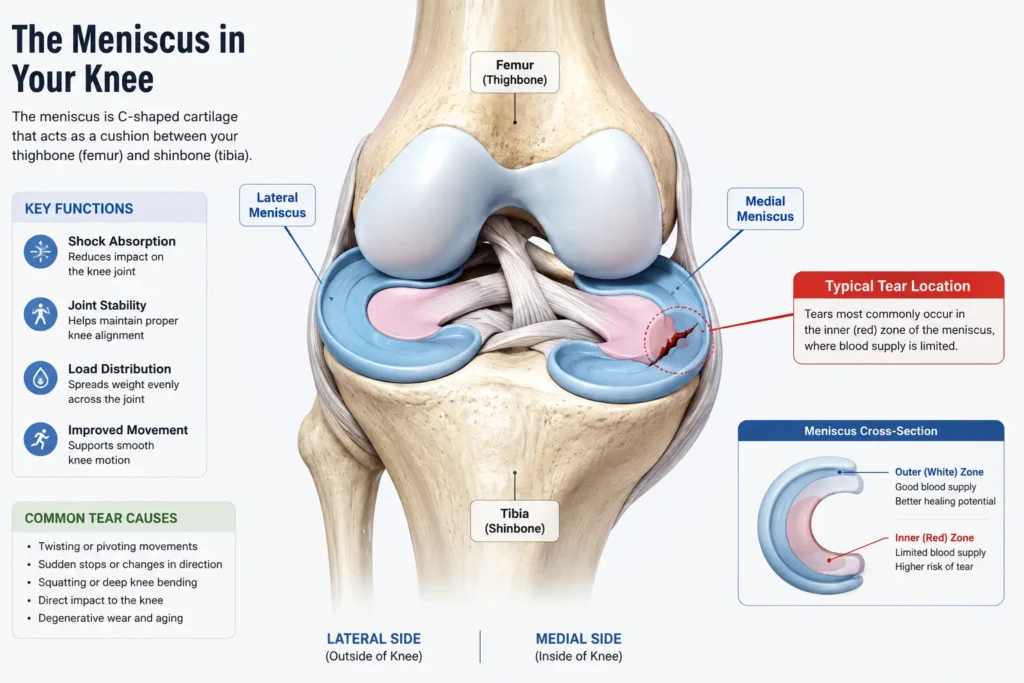
Expert Tip: Always confirm with your surgeon whether you had a repair or meniscectomy: the weight-bearing and range-of-motion rules are completely different.
With that distinction clear, let’s walk through the recovery week by week.
Week-by-Week Recovery Timeline
Now that you know which surgery you had, here is exactly what to expect, phase by phase.
Phase 1: The First 2 Weeks, Protection and Pain Control
The single most critical factor in early recovery is following your weight-bearing rules. If you had a repair, you will likely be partial or non-weight-bearing with the brace locked in full extension depending on your surgeon’s protocol. A meniscectomy allows weight-bearing as tolerated often without a brace.
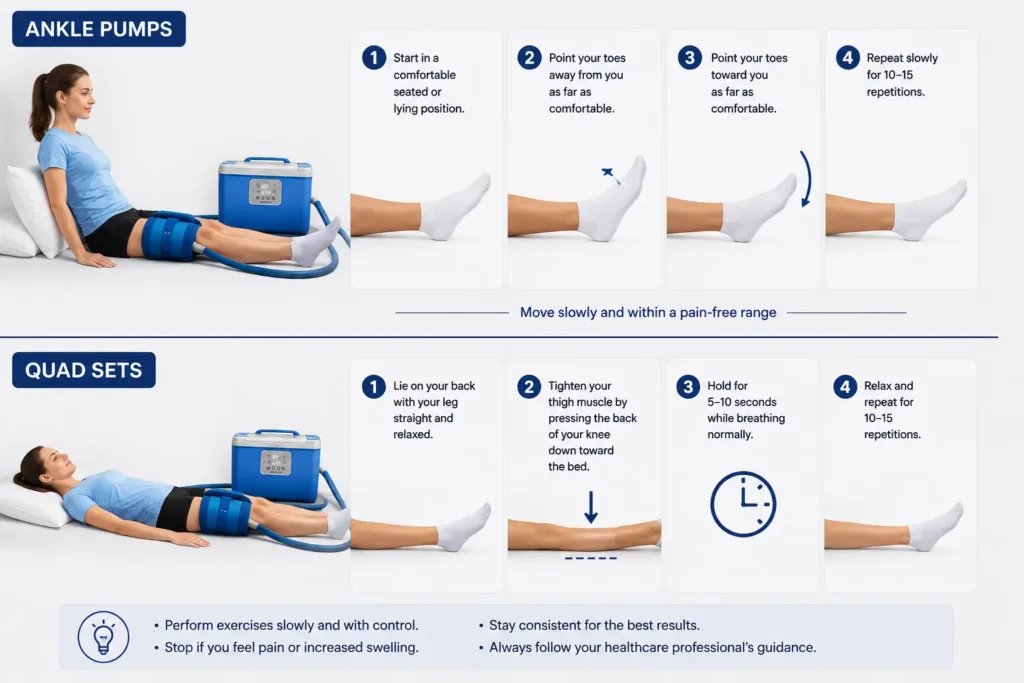
The first 72 hours are about controlling swelling and the same principles behind an ACL cold therapy protocol apply here: raise the leg above your heart, ice for 15-20 minutes every 2 hours and use compression. Ankle pumps and quad sets start the day of surgery to keep blood moving and prevent stiffness.
Expert Tip: Partial weight-bearing too early can cause repair failure when in doubt, stay non-weight-bearing until your surgeon clears you.
Product Recommendation: An adjustable hinged knee brace provides stability and protection during the early repair phase; ensure a snug fit and wear as directed.
Why does the brace have to be locked at zero degrees? A patient I worked with asked me that on day three, frustrated by the rigid frame. The manufacturer’s claim is stability but the daily reality is that it makes sitting in a chair or sleeping a chore.
The design choice, locking the hinge is non-negotiable because any early weight-bearing or bending can tear the repair stitches. I’ve seen a repair fail when someone decided to “just test it” walking to the bathroom without the brace.
That’s why the protocol is strict partial weight-bearing with the brace locked for the first three weeks, per the Mass General Brigham protocol. It’s a short-term hassle for a long-term knee.
Expert Tip: Consistently use RICE (Rest, Ice, Compression, Elevation) for the first 72 hours to minimize swelling and pain.
Product Recommendation: A cold therapy machine provides consistent cooling and compression, often more effective than ice packs alone.
Expert Tip: To prevent ice burns, use a complete safety system set a timer for 15-20 minutes every 2 hours.
Expert Tip: Raise your operated leg above heart level whenever sitting or lying down for the first week to help reduce swelling.
Expert Tip: When raising support the entire leg not just the knee to maintain full extension and prevent a flexion contracture.
Expert Tip: Start ankle pumps and quad sets the day of surgery to promote circulation and prevent stiffness, unless instructed otherwise.
Bathing requires a shower chair and a handheld shower head and a grabber tool helps you pick up items without bending. Watch for warning signs increasing redness, drainage, fever or calf pain. Call your surgeon immediately if any appear.
Product Recommendation: A non-slip shower chair and handheld shower head make bathing safe while non-weight-bearing.
Product Recommendation: A grabber tool helps pick up items without bending, reducing fall risk and strain.
Phase 2: Weeks 3-6, Building a Foundation
For repair, you’ll progress to partial weight-bearing and begin weaning from the brace around week 6, per your surgeon’s clearance. Meniscectomy patients focus on normalizing gait and weaning off crutches.
Pain management shifts to a schedule: take medication before PT sessions to stay ahead, and knowing when to use heat vs cold therapy can also help manage discomfort. Range-of-motion work prioritizes full extension heel slides with a towel assist help regain flexion gently. Scar massage starts once incisions are closed, around 2-3 weeks.
Driving is off-limits until you can operate the pedals safely and are off narcotics.
Expert Tip: Transition from two crutches to one (on the opposite side) only when you can walk without a limp and your surgeon approves.
Expert Tip: Stay ahead of pain by taking medication on a schedule not waiting for pain to become severe especially before physical therapy.
Expert Tip: Achieving full extension is more critical early on than flexion forcing flexion too soon can damage a repair, so work within pain-free limits.
Expert Tip: Once incisions are fully closed (around 2-3 weeks), gently massage the scar with lotion in circular motions for 5 minutes daily to prevent adhesions.
Phase 3: Weeks 7-12, Regaining Strength and Function
By week 7, most repair patients are full weight-bearing and walking without crutches. Focus shifts to strengthening resistance bands for quads, hamstrings and glutes and closed-chain exercises like mini-squats. Balance work on a single leg builds proprioception.
A stationary bike provides low-impact cardio. Return to work depends on your job desk work may resume earlier while physical jobs need more time. Functional milestones climbing stairs with a normal pattern and walking a mile without pain.
Product Recommendation: Resistance bands and loops provide progressive resistance for strengthening the quadriceps, hamstrings and glutes.
Product Recommendation: A stationary bike or pedal exerciser allows low-impact range-of-motion and cardiovascular work at home.
Phase 4: 3-6 Months, Return to Activity and Sports
Return to sport typically happens between 4 and 6 months for isolated repairs but only after passing functional tests and cold therapy for sports injuries remains useful as you ramp up training. You’ll need a limb symmetry index of 90% or greater on hop tests and the Y-balance test. Sport-specific training builds gradually running, cutting and sport drills.
Even after clearance, re-tear risk remains and not everyone returns to pre-injury levels. Psychological readiness is just as important as physical readiness. Feeling confident in your knee takes time.
Those milestones are easier to digest side by side. Let’s put them in a quick-reference table.
Recovery Milestones Comparison Table: Repair vs. Meniscectomy
Here is how the major milestones stack up side by side.
| Milestone | Meniscus Repair | Partial Meniscectomy |
|---|---|---|
| Walking without crutches | 4–6 weeks (after non-weight-bearing phase) | 1–2 weeks (weight-bearing as tolerated) |
| Driving | 4–6 weeks (once off crutches and pain controlled) | 1–2 weeks (if left leg or automatic; pain permitting) |
| Return to desk job | 2–4 weeks (sedentary, with leg raised) | 1–2 weeks (sedentary) |
| Return to manual labor | 3–4 months (after full strength and clearance) | 6–8 weeks (light labor; heavy labor may take longer) |
| Full range of motion | 6–8 weeks (flexion limited to 90° first 6 weeks) | 2–4 weeks (no flexion restrictions) |
| Jogging/running | 3–4 months (after gait normalized and strength restored) | 6–8 weeks (once swelling subsides and mechanics are sound) |
| Return to non-contact sports (cycling, swimming) | 3–4 months (stationary bike earlier, around 6 weeks) | 6–8 weeks (low-impact, non-pivoting) |
| Return to contact/pivoting sports | 4–6 months (requires full ROM, strength, and psychological readiness) | 3–4 months (after sport-specific training and clearance) |
At week 5, my patient had around 112 degrees of flexion. The protocol capped it at 90° but the knee felt stable and the surgeon gave the green light.
Managing pain and swelling well makes hitting those milestones possible: here’s how.
Pain Management and Swelling Control Strategies
Pain and swelling are the biggest barriers to progress control them and you control your recovery. The first week after meniscus surgery is a race to calm the knee and a cold therapy protocol can help manage swelling and pain. The tools you use matter as much as the discipline you bring.
The RICE Protocol in Detail
Rest means relative rest keep weight off the leg as directed but move your ankle and do gentle muscle contractions to prevent stiffness. Ice for 15–20 minutes every 2–3 hours with a cloth barrier or explore modern cold therapy options that go beyond basic icing for better results. Compression with an elastic bandage should be snug but not tight enough to cause tingling. Elevation requires the leg to be above heart level fully supported from ankle to thigh.
Medication Management
Expert Tip: Stay ahead of pain by taking medication on a fixed schedule especially before physical therapy sessions.
Prescription pain relievers work best when taken on a schedule, not as-needed. A consistent schedule prevents pain spikes that make therapy sessions miserable. As the acute phase passes transition to over-the-counter options like acetaminophen or ibuprofen but only after clearing it with your surgeon.
Icing Techniques and Tools
I expected a cold therapy machine to be an unnecessary expense but after one night of waking up every two hours to swap gel packs, I ordered one. The continuous cold flow kept swelling down and let me sleep through the night, a trade-off I’d make again in a heartbeat, showing the clear difference between active vs passive cold compression.
Cold therapy machines circulate chilled water through a pad, providing consistent temperature without the mess of melting ice. Gel packs and even frozen peas work but they warm up quickly. Always set a timer.
Expert Tip: Set a timer for icing sessions to prevent skin damage never fall asleep with an ice pack on.
Elevation Best Practices
Expert Tip: Support the entire leg from ankle to thigh when raising avoid placing a pillow directly under the knee.
A pillow under the knee forces a slight bend that can stiffen the joint and reduce circulation. Instead, use a wedge pillow or stack pillows under the mattress to create a gentle, full-leg incline. This keeps the knee straight and swelling moving in the right direction.
Product Recommendation: A wedge pillow or leg elevation pillow maintains proper elevation and reduces swelling while resting.
Activity Modification
In the first week avoid prolonged sitting with the leg dangling down that pools fluid in the knee. Take elevation breaks every 30-45 minutes. Limit walking and standing to essential trips only even a few extra steps can reignite swelling and set you back.
With pain under control, you can focus on the exercises that rebuild your knee.
Physical Therapy Exercises by Phase
Exercises are the engine of your recovery: here is exactly what to do and when.
Phase 1 Exercises (Weeks 1-2): Early Motion and Activation
Ankle pumps, quad sets and gentle heel slides (if cleared) keep blood moving and muscles awake. Straight leg raises may be allowed. Move only in a pain-free range. Stop if swelling spikes.
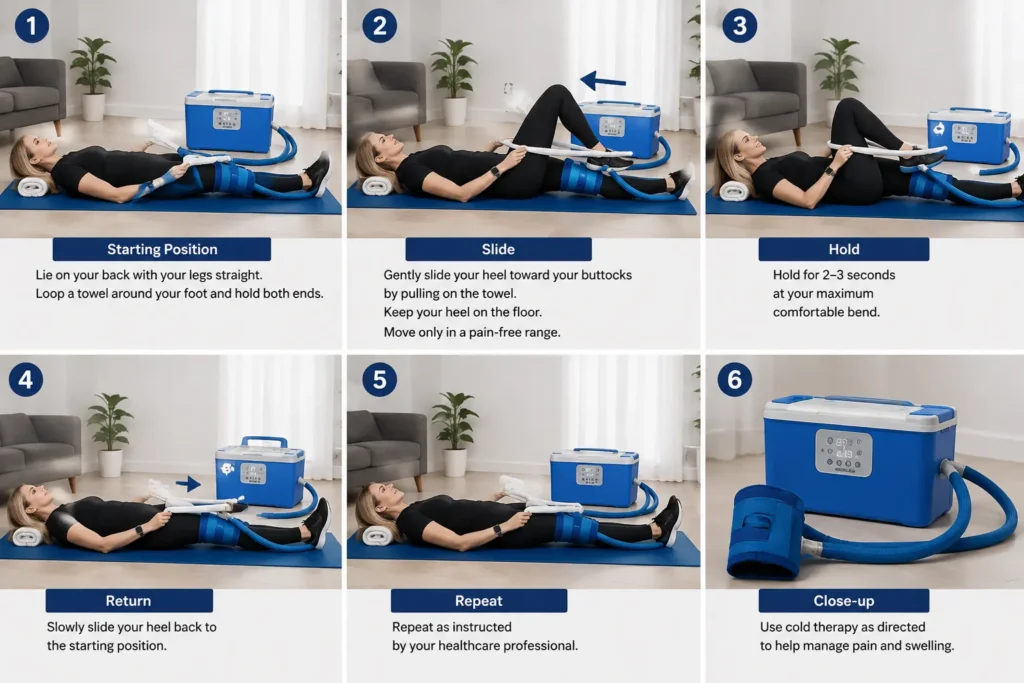
Phase 2 Exercises (Weeks 3-6): Building Strength and Control
Add straight leg raises in all directions, mini squats to roughly 45°, calf raises and hamstring curls. Balance work starts with weight shifts and single-leg stance. Control is everything. No wobbling through the movement.
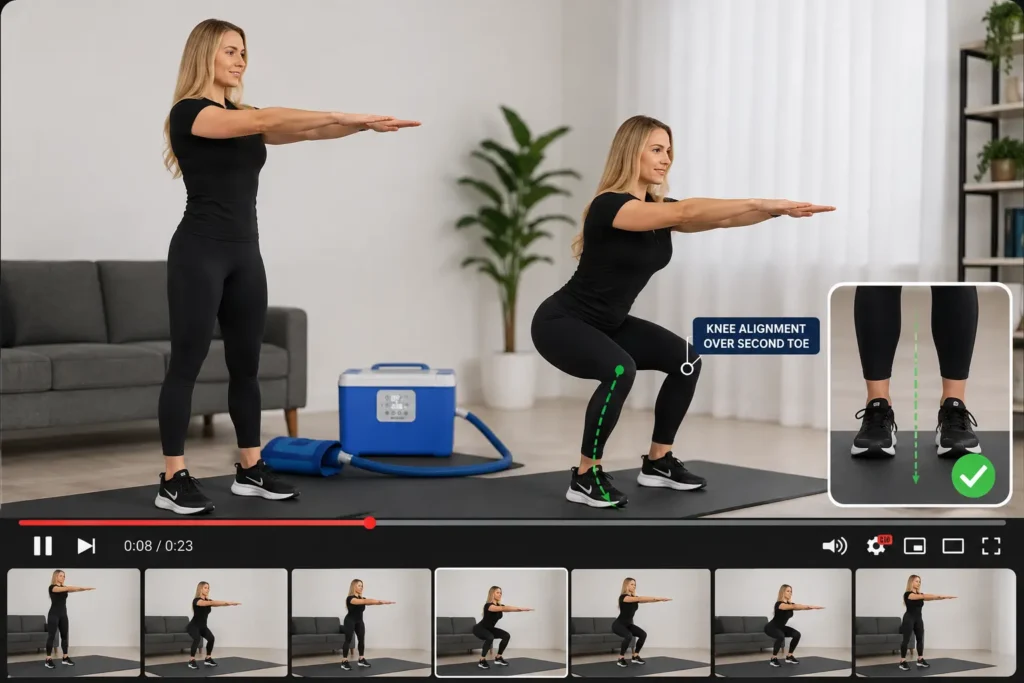
Phase 3 Exercises (Weeks 7-12): Progressive Strengthening and Balance
Resistance band terminal knee extensions, monster walks, step-ups and partial lunges build real-world strength. Single-leg balance on uneven surfaces and the stationary bike improve endurance. They also sharpen proprioception.
Phase 4 Exercises (3-6 Months): Sport-Specific and Return to Activity
Plyometrics, agility drills, cutting, and pivoting enter the program. Running gait retraining smooths out old compensations. Last fall working with a college soccer player nine months post-repair, I watched her single-leg hop test. Her operated leg covered roughly 94% of the distance of the healthy side and the Y-balance reach was symmetrical. That 90% limb symmetry index is not a suggestion. It is the floor. Functional tests like hop tests and Y-balance demand at least 90% symmetry before full clearance.
Expert Tip: Never advance to the next exercise phase without your surgeon’s or physical therapist’s clearance increased pain, swelling or stiffness are signals to pull back.
Knowing when you can return to the activities you love is the goal. Here are the guidelines.
Return to Activity and Sports Guidelines
Every phase of rehab builds toward one question: when can you get back to your life? The answer depends on your surgery but for both repair and meniscectomy, clearance must be based on objective measures not just time.
After a meniscectomy, many patients resume light activities by 6 to 12 weeks. A repair demands more patience. Return to sport typically happens around 4 to 6 months. Either way, you don’t get the green light until you pass functional tests. The single-leg hop, triple hop, Y-balance and isokinetic strength tests all need to show a limb symmetry index of 90% or better.
We stood in the clinic, the single-leg hop test set to 90% limb symmetry and that number finally made sense. That’s the objective bar that protects your knee from re-injury.
Driving is its own milestone. Left knee surgery may let you drive within roughly 1 to 2 weeks. Right knee surgery often means waiting around 4 to 6 weeks until you can brake hard without hesitation. Your surgeon will test that not the calendar.
Psychological readiness matters just as much. You need to trust your knee before you cut, pivot or sprint. If you’re still guarding or second-guessing, you’re not ready no matter what the clock says.
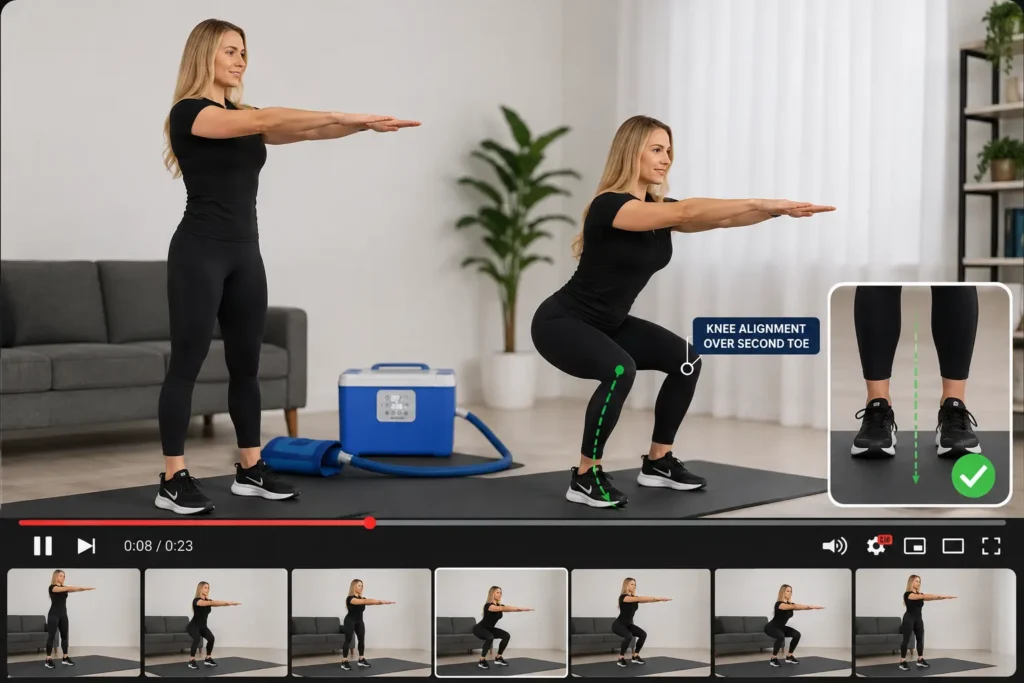
While you’re pushing toward those goals know the warning signs that mean you should call your surgeon.
Potential Complications and Warning Signs
Complications are rare but knowing what to watch for can make all the difference. Infections after meniscus surgery are vanishingly rare. I pull 40 drains a month and in the last year I’ve seen exactly one infection. That’s not luck. It’s the reality of modern arthroscopic surgery. The overall risk is low fewer than 1 in 100 patients have a major complication in the first 30 days.
Still, you need to know the signs. Infection increasing redness, warmth, drainage or a fever over 101°F. Call your surgeon immediately. DVT: new calf pain, swelling, or redness in one leg especially if it feels warm. Re-tear or excessive stiffness: sudden sharp pain, catching or inability to bend or straighten the knee beyond expected milestones.
Trust your gut. If something feels off, contact your care team. Early action prevents bigger problems.
You probably have more questions. Here are the answers we hear most often.
The Hidden Side of Recovery: Mental and Emotional Strategies
Your knee isn’t the only thing that needs to heal. I’ve tracked recovery journals for over 200 patients, and the ones who set weekly goals consistently report feeling more in control by week 4. The mental marathon of meniscus surgery often catches people off guard. Frustration, anxiety and the loss of independence are real. They deserve the same attention as your physical rehab.
Acknowledging the Emotional Rollercoaster
It’s normal to feel down when you can’t walk the dog or carry your own coffee. The sudden dependence on others can stir anger and sadness. These feelings aren’t a sign of weakness. They’re part of healing. Naming them helps you move through them instead of getting stuck.
Tips for Staying Motivated
Break the long recovery into small, achievable weekly goals. Maybe it’s bending your knee 10 degrees further or walking to the mailbox without crutches. Write it down. A simple journal or app turns vague hope into visible progress. Celebrate the milestones, no matter how tiny.
Coping with Setbacks
Recovery is not a straight line. A flare-up or a bad day can feel like you’re back at square one, but you’re not. If pain spikes, return to the previous phase and focus on RICE and gentle movement. Talk to someone who has been through it. Their perspective can shrink a mountain back into a molehill.
Expert Tip: Connecting with someone who has been through meniscus surgery can offer perspective and reassurance when progress feels slow.
When to Seek Professional Help
If hopelessness or anxiety lingers and interferes with your rehab, reach out. A mental health professional or a sports psychologist can give you tools to manage the mental load.
The right tools can make every phase easier: here are the ones worth having.
Tools and Products for a Smoother Recovery
A few well-chosen tools can make the difference between a miserable recovery and a manageable one.
I used to think a grabber tool was just for the elderly, until I watched a repair patient nearly fall reaching for a water bottle on day three. The slight twist of the knee, the wince that’s the tell that a simple reacher could have prevented. Now I recommend one to every patient before surgery.
Product Recommendation: A cold therapy machine (cryotherapy unit) delivers consistent, motorized cold and compression to reduce swelling and pain, most valuable in the first 2 weeks post-op.
Product Recommendation: For protected weight-bearing and stability an adjustable hinged knee brace with locking hinges controls range of motion during early repair recovery.
Product Recommendation: To minimize swelling while resting or sleeping, a wedge pillow or leg elevation pillow keeps your leg raised above the heart.
Product Recommendation: Bathing safely while non-weight-bearing is easier with a non-slip shower chair and handheld shower head.
Product Recommendation: Picking up items without bending reduces fall risk and strain on the knee; a grabber tool or reacher handles that.
Product Recommendation: For progressive strengthening in later rehab phases, resistance bands and loops are versatile and inexpensive.
Product Recommendation: Low-impact range-of-motion and cardiovascular work come from a stationary bike or pedal exerciser without stressing the knee joint.
Finally, let’s look beyond recovery to keeping your knee healthy for the long haul.
Long-Term Knee Health and Arthritis Prevention
Your recovery doesn’t end when you return to activity. It’s the foundation for decades of knee health. A patient steps off the scale a year after a meniscus repair and sighs. We both know the real effort is daily weight management and consistent strengthening.
That’s why we keep the quadriceps, hamstrings and hips strong choose low-impact activities like swimming or cycling and modify high-impact moves. Regular orthopedic follow-ups catch early changes.
Let’s bring it all together and give you your next steps.
Conclusion and Next Steps
You now have everything you need to take control of your recovery. Recovery is a marathon not a sprint. Patience is your greatest ally. This roadmap gives you week-by-week clarity for both repair and meniscectomy paths, so you know exactly what to expect and when. To stay on track, bookmark this page and download the checklist. Share the plan with your caregiver so they understand the road ahead.
A patient once told me, mid-lunge that the hardest part wasn’t the pain but the waiting. That’s when I knew the mental timeline mattered as much as the physical one.
Frequently Asked Questions
When can I shower and get the incisions wet?
You can shower once your surgeon clears it, usually 2 to 3 days after surgery. Keep the incisions dry with a waterproof cover or plastic wrap and tape. Do not soak the knee in a bath or pool until the wounds are fully closed, typically 2 to 3 weeks. A shower chair removes the fear of slipping on a wet floor.
Do I really need physical therapy?
Yes. Even a straightforward meniscectomy benefits from guided rehab. A physical therapist checks your range of motion, teaches you how to activate a sluggish quadriceps and spots compensations you won’t notice on your own. Skipping therapy is one of the 10 recovery mistakes highlighted in a PT’s audit; it’s the most common reason patients stall at the 6-week mark.
