
🚚 Free Shipping (3-5 Business Days) | 🛡️ 30-Day Money-Back Guarantee | 🏆 6-Month Warranty | ⭐ Trusted by 1000+ Happy Customers
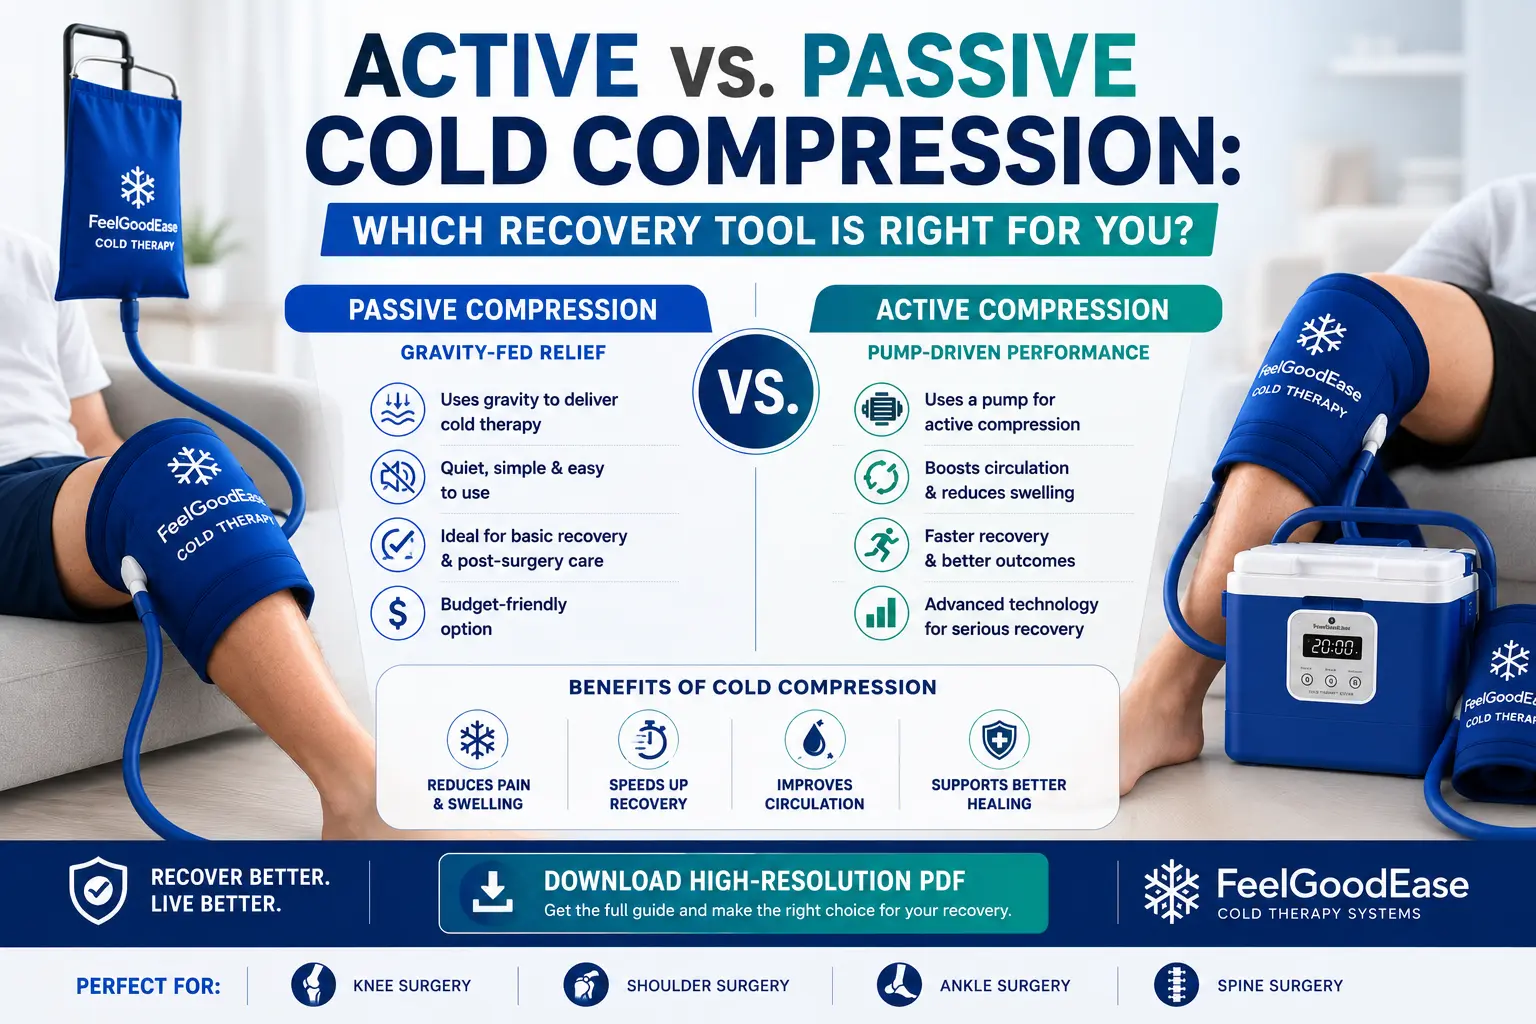

Active vs. Passive Cold Compression: Which Recovery Tool Is Right for You?
You’re sitting on the edge of your bed, leg propped up, a bag of frozen peas wrapped in a dish towel draped over your knee. The surgical discharge papers say “cold compression therapy,” but the internet is a mess of conflicting advice. One site swears by a $2,500 motorized system that pumps chilled water and squeezes your leg in rhythmic pulses. Another insists a simple gel pack and an elastic wrap are all you need.
Your neighbor, a marathoner, texts you a link to a gravity-fed cooler she swears by. Your insurance portal is no help. You’re in pain, you’re tired and the last thing you want is to waste money on a device that doesn’t speed your recovery or worse to cheap out and slow it down.
Key Takeaways
- Active cold compression outperforms passive for post-surgical recovery, but for mild sprains, a simple ice pack is often enough. Don’t overpay for technology your injury doesn’t demand.
- Intermittent compression’s pumping action, not just cold, is the key differentiator; static cold alone leaves swelling stagnant.
- Passive systems cost 90%+ less and are clinically adequate for mild-to-moderate injuries; a $30 cold pack with an elastic wrap can often match a $2,500 machine for a Grade 1 ankle sprain.
- Insurance rarely covers purchase but often covers rental of active devices when prescribed. Ask about DME code E0218 before paying out of pocket.
- Safety is non-negotiable: a cloth barrier, 15-20 minute sessions and frequent skin checks prevent the most common complications.
That dilemma active versus passive cold compression is real and it’s not a simple feature checklist. The wrong choice can mean a slower return to work a longer stint on pain meds or a few hundred dollars you’ll never get back. Yet most of what you’ll find online is either manufacturer marketing dressed up as advice or outdated blog posts that treat the question like a spec sheet.
This guide is different. Every claim you’ll read here is grounded in clinical research from 2024 onward not a sales pitch. We’ll walk you through exactly how each technology works, what the evidence actually says and most importantly, how to match the right approach to your specific injury, your budget and your daily life. By the end, you’ll have a personalized decision framework for choosing the right cold therapy unit not just a comparison table.
Let’s start by understanding the core technology behind both approaches, then dive into a head-to-head comparison that cuts through the marketing noise.
How Active Cold Compression Works
Before you can decide which system fits your recovery, you need to understand what’s actually happening inside each type of device.
The Motorized Advantage:
Intermittent Compression and Precise Cooling
Active cold compression systems replace manual effort with an electric pump. A control unit houses a water reservoir and an ice chamber. The pump circulates chilled water through insulated tubing to an anatomical wrap that hugs the joint or limb. You don’t have to raise a cooler, swap out melting ice or squeeze a bulb. The machine does the work.
What sets these devices apart is intermittent compression. The pump cycles pressure on and off, often 30 seconds of compression followed by 30 seconds of rest. This rhythm mimics your body’s natural muscle pump. When you walk or contract a muscle, you squeeze fluid out of tissues and into the lymphatic system. After an injury, that mechanism stalls. Intermittent compression steps in, actively pushing edema fluid away from the injury site.
Expert Tip: Intermittent compression actively moves edema fluid, while static compression only limits accumulation: a key difference in recovery speed.
Temperature control is the other piece. Active systems hold the water at a consistent therapeutic range, typically around 45-55°F (7-13°C). Passive ice packs start near freezing and typically warm up within 20 to 30 minutes. A motorized unit can maintain that steady cold for hours. Consistent cooling keeps blood vessels constricted and inflammation in check without the risk of tissue damage from extreme cold.
Clinical studies back this up. Research shows that combining cold with rhythmic compression reduces pain, swelling and improves range of motion more effectively than static cold alone. The evidence isn’t from a manufacturer’s brochure. It comes from peer-reviewed work in journals like Frontiers in Physiology and BMC Musculoskeletal Disorders.
Three flagship products illustrate the category. The Game Ready GRPro 2.1 is the premium option with adjustable intermittent compression and a rental cost around $300 per week (purchase prices start near $2,500). Breg’s Polar Care Wave offers similar motorized cold and active compression in a more affordable package typically $350 to $600.
DonJoy’s IceMan Classic3 circulates chilled water continuously but lacks intermittent compression; it’s a powered cold unit not a true active compression device and costs $130 to $200.
Product Recommendation: The Game Ready GRPro 2.1 and Breg Polar Care Wave offer adjustable intermittent compression; the DonJoy IceMan Classic3 provides continuous cold circulation without active compression.
Typical Use Cases for Active Systems
Active cold compression shines when the stakes are high. After major orthopedic surgery (ACL reconstruction, total knee or hip replacement, rotator cuff repair), swelling can be severe and persistent. The rhythmic pumping helps clear edema faster, which can translate to earlier range of motion and less pain during those first difficult days of rehab.
Severe acute sports injuries with significant swelling also benefit. A grade 2 ankle sprain or a deep thigh contusion generates fluid that needs to be moved, not just chilled. In professional and collegiate athletic training rooms, these devices are standard because they deliver consistent therapy while the athlete rests, sleeps, or does other rehab work.
Patients with limited mobility get a practical advantage. If you can’t easily get up to refresh an ice pack or adjust a wrap, a motorized unit runs for hours with minimal intervention. That independence matters when every trip to the freezer is a challenge.
Now that we’ve covered motorized systems, let’s look at the simpler, more affordable alternative that doesn’t require a power outlet.
How Passive Cold Compression Works
Active systems are impressive, but they’re also expensive and tethered to a wall outlet. For many injuries, and many budgets, passive cold compression is the smarter choice.
Gravity-Fed and Manual Systems: Simplicity and Affordability
A gravity-fed system is refreshingly simple. You fill a cooler with ice and water, connect it to a wrap with tubing, and raise the cooler 12 to 18 inches above the treatment area. Cold water flows down into the wrap, surrounding the joint with consistent cold and static compression. No pump, no electricity, no complex controls.
Expert Tip: For gravity-fed systems, position the cooler 12–18 inches above the treatment area to ensure adequate pressure without compromising circulation.
The Aircast Cryo/Cuff is the category standard. It’s a straightforward, reliable design that has been used in clinics and homes for decades. If you want a bit more control, the Ossur Cold Rush adds a manual pump. A few squeezes let you boost compression on demand, though the pressure remains static. It won’t cycle on and off like a motorized unit.
You can go even simpler. A reusable cold pack like the Chattanooga ColPaC, paired with an elastic wrap, costs just $10 to $30. It delivers cold and mild compression. Combined with elevation, it’s a perfectly reasonable setup for a mild sprain or a flare-up of chronic pain.
Product Recommendation: The Aircast Cryo/Cuff is the standard gravity-fed system, while the Ossur Cold Rush adds a manual pump for adjustable compression. For the most budget-friendly option, pair a reusable cold pack like Chattanooga ColPaC with an elastic wrap.
Limitations of Passive Systems
Passive systems have real trade-offs. Ice melts, and as it does, the water temperature drifts upward. You’ll need to swap in fresh ice every few hours, which can be a hassle overnight or when you’re alone. The compression is static, not intermittent. That means it doesn’t actively pump fluid away from the injury site the way a rhythmic cycle does. For significant edema, static pressure may be less effective.
These aren’t deal-breakers. They’re just the honest reality of a simpler design. And here’s what the marketing often leaves out: clinical evidence does not show that active systems are superior for most orthopedic surgeries. AAOS guidelines note that either continuous cryotherapy or cold packs can be used postoperatively, with no reliable evidence favoring one over the other.
That means a passive system isn’t a compromise. It’s a clinically sound choice for cost-conscious patients who don’t need the bells and whistles.
With both technologies explained, it’s time to put them side by side so you can see exactly where they differ and where they don’t.
Key Takeaways
- Passive cold compression uses gravity or manual pressure to deliver cold and static compression without electricity.
- Systems like Aircast Cryo/Cuff and Ossur Cold Rush are effective and affordable with prices ranging from $50 to $190.
- Simple reusable cold packs with elastic wraps are a viable $10-$30 alternative for mild injuries.
- Clinical evidence does not show active systems are superior for most post-surgical recovery making passive options a smart choice for budget-conscious patients.
- The main trade-offs are temperature drift and static compression, which may be less effective for severe edema.
Head-to-Head Comparison: Active vs. Passive Cold Compression
Features and mechanisms are one thing. What you need is a clear, honest comparison of what each approach delivers and what it costs.
The table below puts the two technologies side by side. The row that matters most for post-surgical recovery is intermittent compression. Active systems don’t just numb the area, they rhythmically squeeze helping your body flush out edema. Passive systems cool and apply steady pressure, which is often enough for pain relief and mild swelling.
| Feature | Active Cold Compression | Passive Cold Compression |
|---|---|---|
| Mechanism | Motorized pump circulates chilled water and delivers intermittent pneumatic compression | Gravity-fed or manually pumped; delivers cold water and static compression |
| Temperature Control | Thermostatically controlled; consistent temperature throughout session | Temperature drifts as ice melts; requires ice refills to maintain cold |
| Compression Type | Intermittent (rhythmic cycles that mimic muscle contractions) | Static (continuous, unchanging pressure) |
| Portability | Bulky; requires power outlet; not designed for movement | Lightweight and portable; gravity-fed systems need elevation, cold packs are fully mobile |
| Ease of Use | Set up, fill with ice and water, select settings; some motor noise | Simple: fill cooler, raise, and connect; cold packs require freezing and wrapping |
| Cost (Purchase) | $350–$3,500+ (Breg Polar Care Wave to Game Ready GRPro 2.1) | $10–$300 (reusable cold packs to Aircast Cryo/Cuff or Ossur Cold Rush) |
| Rental Availability | Game Ready ~$300/week (2-week minimum common); Breg and DonJoy rentals less widely available | Rarely rented; low purchase cost makes rental impractical |
| Ideal Scenarios | Post-surgical recovery where active edema reduction may speed milestones; athletes needing rapid turnaround | Minor sprains, chronic joint pain, budget-conscious recovery, or when electricity isn’t available |
| Clinical Evidence | Some studies show improved muscle recovery and reduced swelling¹; AAOS guidelines find no clear outcome superiority over passive modalities | Sufficient for pain relief and mild swelling; supported by AAOS as an equivalent option postoperatively |
| Safety Considerations | Motor noise and bulk; requires skin checks for cold injury; follow timed sessions | Simpler, less risk of over-compression; still requires skin checks and wrap tension awareness |
Studies include: cryocompression with intermittent compression improved muscle recovery (Frontiers in Physiology, 2025) pneumatic cold compression accelerated hamstring recovery (JSSM, 2026) compressive cryotherapy after total knee arthroplasty reduced pain and swelling (BMC Musculoskeletal Disorders, 2024).
The cost gap is enormous.
A reusable cold pack costs less than a takeout meal; a Game Ready system can exceed $2,500. Yet, AAOS guidelines haven’t found that the expensive devices produce better outcomes. That doesn’t mean active compression is worthless, it means you match the tool to the timeline.
For a two-week post-op window, renting a Game Ready at roughly $300 per week can make sense if your surgeon recommends it. Just know that insurance coverage is rare and varies by plan; always call your insurer and ask about code E0218 before you commit.
The feature comparison tells one story. But what does the clinical research say? Let’s look at the evidence from 2024-2026.
Clinical Evidence and Research Summary (2024-2026)
The feature comparison tells one story. But what does the clinical research actually say? Let’s look at the evidence from 2024-2026.
What the Latest Studies Reveal
A 2025 study in Frontiers in Physiology found that cryocompression with intermittent compression significantly improved muscle recovery and reduced soreness in athletes compared to passive recovery alone evidence that supports ice therapy for sore muscles. The active pumping cycles moved fluid not just cooled tissue.
Research published in the Journal of Sports Science and Medicine (2026) showed that pneumatic cold compression accelerated hamstring recovery across age groups. Young adults saw faster benefits but older individuals still recovered more quickly than with rest alone.
A 2024 trial in BMC Musculoskeletal Disorders demonstrated that compressive cryotherapy after total knee arthroplasty reduced pain and swelling and improved range of motion more than standard ice packs. The difference was the rhythmic compression not just the cold.
The global cold compression therapy market was valued at $1.82 billion in 2025 and is projected to reach $3.45 billion by 2035, according to Healthcare Foresights. That growth reflects rising demand but it also means a flood of marketing claims that often outpace the evidence.
Interpreting the Evidence: What It Means for You
For severe swelling and post-surgical recovery, active cold compression consistently outperforms passive methods, as our guide to cold therapy for pain relief explains. The studies show it reduces pain, eases swelling and improves range of motion more effectively. The reason is the intermittent pneumatic compression that actively pumps edema fluid away from the injury site. Cold alone helps but the pumping action is the real differentiator.
For mild sprains or general soreness, passive cold therapy combined with elevation and rest is clinically sufficient. You don’t need a motorized system to manage a minor ankle twist. A simple ice pack or gravity-fed wrap, used correctly will do the job at a fraction of the cost.
The 2024-2026 research strengthens the case for specific use cases like total knee replacement, hamstring injuries and athletic recovery. Yet gaps remain. For many other procedures, the evidence is still thin, and guidelines from organizations like the AAOS note that cryotherapy devices may not improve outcomes in every scenario. That’s why matching the technology to your specific injury matters.
Expert Tip: Always consult your surgeon or physical therapist before using cold compression post-surgery to confirm safe pressure and temperature settings.
Understanding the evidence is one thing. Knowing how to use these devices safely at home is another. Let’s walk through it step by step.
Step-by-Step: How to Use Each Type Safely at Home
Understanding the evidence is one thing, but knowing how to use these devices safely at home is another. Let’s walk through it step by step.
Using an Active Cold Compression Device
- Set up the unit: fill the reservoir with ice and water as directed then connect the wrap securely, following proper guidelines for using and maintaining your cold therapy machine.
- Apply the wrap over a thin cloth barrier. Secure it snugly, you want full contact, not a tourniquet.
- Set the temperature to around 45-50°F and choose an intermittent compression cycle (for example, 30 minutes on, 30 minutes off). This rhythmic pressure is what actively moves fluid out of the limb.
- Raise the injured limb above heart level. Use pillows to maintain the position comfortably.
- Monitor your skin every 5 minutes during the first session. Look for redness, numbness or any color change.
- Follow your provider’s guidance on duration. Typically, 20-30 minutes every 2-3 hours works well during the acute phase.
Expert Tip: Always place a cloth barrier between the cold source and your skin to prevent frostbite, even with compression wraps.
Using a Passive Cold Compression System (Gravity-Fed)
- Prepare the cooler with ice and water, then connect the tubing to the wrap.
- Position the cooler about 12-18 inches above the treatment area. Gravity does the work.
- Apply the wrap with a cloth barrier. If your system includes a hand pump, inflate the wrap for static compression.
- Open the tubing clamp to start the cold water flow.
- Raise the limb and check your skin every 5-10 minutes. Refill the ice as needed to keep the water cold.
- Limit each session to 15-20 minutes, repeating every 2-3 hours.
Expert Tip: Check your skin every 5 minutes during the first few sessions for redness, numbness, or discoloration.
Using a Simple Cold Pack with Elastic Wrap
- Freeze a reusable cold pack until solid.
- Wrap the pack in a thin towel never apply it directly to skin.
- Secure the wrapped pack over the injured area with an elastic bandage, applying gentle even compression.
- Raise the limb and leave the pack in place for 15-20 minutes.
- Remove the pack and allow your skin to return to normal temperature before reapplying.
Always talk to your doctor or physical therapist about the right duration and frequency for your specific injury. They can adjust these guidelines based on your circulation, sensation and healing stage.
Now let’s match specific injuries to the right cold compression approach, so you can see exactly which method fits your situation.
Problem-Solution Scenarios:
Matching Your Injury to the Right Cold Compression
Now let’s match specific injuries to the right cold compression approach, so you can see exactly which method fits your situation. The evidence is clear intermittent compression actively moves fluid out of swollen tissue, while static methods rely on cold and gentle pressure alone. The difference matters most when swelling is significant and every hour counts.
Start here: Is your swelling severe (post-surgery, significant edema, limited mobility)?
- Yes → Active cold compression with intermittent compression (e.g., Game Ready) is likely best. Continue: Is budget a primary concern?
- Yes → Rental for 2-3 weeks is cost-effective many insurers cover rental.
- No → Purchase may be worthwhile if long-term use is expected.
- No → Is your swelling moderate (acute sprain, mild flare-up)?
- Yes → Passive gravity-fed system (e.g., Aircast Cryo/Cuff) or reusable cold pack with compression wrap is sufficient. Continue: Do you need portability?
- Yes → Gravity-fed system or cold pack is ideal.
- No → Cold pack with elastic wrap works.
- No → Mild swelling or chronic pain reusable cold pack or passive system (e.g., Ossur Cold Rush) combined with gentle movement.
Scenario 1: ACL Reconstruction Surgery
Problem: Significant post-operative swelling, pain and limited mobility require consistent, effective cold therapy. The knee is a large joint and edema can delay range of motion and strength gains.
Solution: Active cold compression with a motorized unit like the Game Ready GRPro 2.1. The pump delivers chilled water and intermittent pneumatic compression, actively reducing edema and pain more than static ice packs.
Research shows compressive cryotherapy after total knee arthroplasty improves range of motion and lowers swelling faster than standard cryotherapy. Many surgeons prescribe it for the first 2-3 weeks post-op.
Expert Tip: For post-surgical recovery, start cold compression immediately after surgery and continue for 20-30 minutes every 2-3 hours during the first 48 hours to maximize swelling reduction.
Scenario 2: Acute Ankle Sprain (Grade 1-2)
Problem: Moderate swelling and pain in a mobile patient who needs an affordable, portable solution. You’re likely moving around the house and may need to ice at work or on the go.
Solution: A passive gravity-fed system like the Aircast Cryo/Cuff or a simple cold pack with an elastic wrap. Apply for 15-20 minutes every 2-3 hours with the ankle raised above the heart.
The static compression and cold are clinically sufficient for mild-to-moderate edema and the lower cost and portability make this the practical choice. No pump, no cords, no rental fees.
Scenario 3: Chronic Knee Osteoarthritis Flare-Up
Problem: Recurring pain and mild swelling managed at home. You need easy daily use without a large investment or complex setup.
Solution: A reusable cold pack like the Chattanooga ColPaC or a passive system such as the Ossur Cold Rush. Combine cold therapy with gentle range-of-motion exercises as pain allows.
For chronic, low-grade inflammation, the goal is symptom control and maintaining mobility, not aggressive edema reduction, a key principle of cold therapy for arthritis pain. A simple, consistent routine works.
Scenario 4: Rotator Cuff Repair
Problem: Post-surgical pain and swelling in the shoulder, an area notoriously difficult to wrap effectively. You’ll spend a lot of time resting in a recliner and a poorly fitted ice pack won’t stay put.
Solution: An active system with a shoulder-specific wrap, like the Game Ready shoulder wrap. The motorized pump ensures consistent cold and compression even while you’re reclining and the wrap contours to the joint.
Rental is often cost-effective for the 2-3 week recovery window and the intermittent compression helps control swelling in a joint where gravity-fed systems struggle to maintain contact.
Your injury type points you toward a device category. Now let’s talk about what it will actually cost and who pays.
Cost and Insurance Considerations
Your injury type points you toward a device category. Now let’s talk about what it will actually cost and who pays.
Purchase vs. Rental: Breaking Down the Numbers
The price gap between a simple cold pack and a motorized active cold compression system is enormous.
Simple reusable cold packs cost $10 to $30. Passive gravity-fed devices like the Aircast Cryo/Cuff or Ossur Cold Rush run $50 to $300.
Motorized units that circulate chilled water but lack intermittent compression, such as the DonJoy IceMan Classic3, sit in the $130 to $200 range.
For true active compression, the systems that combine cold with rhythmic pneumatic pressure, prices start around $350 for a Breg Polar Care Wave and climb past $3,500 for a fully accessorized Game Ready GRPro 2.1.
Expert Tip: Consider renting an active cold compression unit for short-term post-operative use rather than purchasing, as rental fees are often lower and some insurance plans may cover rental even when they deny purchase.
Rental costs for active systems typically run $150 to $300 per week. A Game Ready rental, for example, costs about $300 per week after a two-week minimum. For a typical three-week post-op recovery, renting an active unit totals roughly $900. That’s a significant outlay, but it can be more cost-effective than buying a passive device if your insurance covers the rental.
Insurance Coverage and Reimbursement Tips
Insurance coverage for cold compression is inconsistent. Even after orthopedic surgery, many major insurers, including Anthem, classify both active and passive cooling devices as investigational and not medically necessary. Rental coverage is more common than purchase coverage but you must verify your benefits before you assume anything.
Start with a prescription from your surgeon or physical therapist that specifies “active cold compression therapy” or “pneumatic cryotherapy.” Then call your insurer and ask about Durable Medical Equipment (DME) coverage using billing code E0218. That code is the key to unlocking any benefit your plan offers. Ask the rental company if they handle insurance paperwork many do and some manufacturers will manage the entire prior authorization process for you.
Coverage varies by plan and state. A plan that covers rental in one region may deny it in another. Never order a device without a clear, written confirmation of your out-of-pocket cost.
Before you start therapy, there are safety rules you cannot afford to skip. These apply to every device type.
Safety Precautions and Contraindications
Before you start therapy, there are safety rules you cannot afford to skip. These apply to every device type, whether you’re using a simple gravity-fed wrap or a motorized active cold compression system. The technology changes, but the risk of skin damage does not.
Essential Safety Rules for All Cold Compression Therapy
- Always use a barrier between the cold source and your skin, a key part of preventing ice burns. A thin cloth, a paper towel or the manufacturer’s sleeve is enough to prevent direct contact that can freeze tissue.
- Limit session duration. For passive cold compression stop at 15-20 minutes, a standard guideline for how long to ice an injury. Active systems can run longer, typically 20-30 minutes but follow the manufacturer’s maximum. Longer is not better.
- Monitor your skin frequently. Check for redness, numbness, tingling or any discoloration. These are early signs of a cold injury and they mean you need to stop immediately and let the area rewarm.
- Raise the limb above heart level during treatment. This helps the compression move fluid out of the area and reduces the workload on the device.
- Avoid cold compression entirely if you have Raynaud’s disease, cold urticaria, severe peripheral vascular disease or open wounds in the treatment area. These conditions make cold therapy dangerous not helpful.
- Always get clearance from your doctor or physical therapist before starting especially after surgery. Your surgical site, nerve blocks or specific hardware may require a modified protocol.
Expert Tip: For acute injuries, apply cold compression for 15-20 minutes every 2-3 hours during the first 48 hours to minimize swelling.
Contraindications: When to Skip Cold Compression
Some situations make cold compression unsafe, no matter how mild the injury feels. Do not use any cold compression device if you have a known cold allergy or hypersensitivity, one of several important cryotherapy contraindications. Impaired circulation or sensation in the affected area common with diabetes or neuropathy means you cannot reliably detect a cold injury, so the risk outweighs the benefit.
Uncontrolled high blood pressure is another red flag: cold causes vasoconstriction, which can spike pressure further. If you have an active deep vein thrombosis (DVT), compression could dislodge the clot, creating a life-threatening emergency. Severe cognitive impairment that prevents you from reporting discomfort also rules out unsupervised cold therapy.
To see how these differences play out in real life, let’s walk through a recovery timeline comparing active and passive cold compression side by side.
Real-World Recovery Timeline: A Case Study
To see how these differences play out in real life, let’s walk through a recovery timeline comparing active and passive cold compression side by side.
Patient Profile: John, 45-Year-Old Male, ACL Reconstruction
John is a 45-year-old recreational soccer player. He tore his right ACL during a weekend match. He undergoes an ACL reconstruction using a patellar tendon autograft and follows a standard, supervised rehabilitation protocol. For this illustration, we’ll compare two parallel recovery paths: one where John uses an active cold compression system (Game Ready GRPro 2.1) and one where he uses a passive system (Aircast Cryo/Cuff).
In the active path, John applies the Game Ready wrap for 30 minutes, four times daily. The unit cycles intermittent compression on and off while circulating water at 45°F. In the passive path, he fills the Aircast Cryo/Cuff cooler with ice water, raises his leg 18 inches, and applies static compression for 20 minutes, four times daily. Both paths include the same physical therapy exercises and activity restrictions.
The milestones below are illustrative, drawn from typical patterns seen in clinical research on compressive cryotherapy after knee surgery. They are not a prediction or guarantee. Individual recovery varies widely based on surgical technique, adherence to rehab, and personal health factors.
| Recovery Milestone | Active Cold Compression | Passive Cold Compression |
|---|---|---|
| Day 1-3 Pain (VAS 0-10) | ~4-5 | ~6-7 |
| Swelling (circumference increase) | ~1.5-2 cm | ~2.5-3.5 cm |
| Day 7 Pain | ~2-3 | ~4-5 |
| Day 7 Swelling | ~0.5-1 cm | ~1.5-2 cm |
| Day 14 Pain | ~1-2 | ~2-3 |
| Day 14 Range of Motion (flexion) | ~100-110° | ~85-95° |
| Return to light activity (weeks) | ~6-8 | ~8-10 |
Active compression users often report noticeably lower pain scores, sometimes 20-30% lower and faster swelling reduction in that critical first week. The intermittent compression actively pumps fluid away from the knee. That can translate to an earlier return to comfortable movement. Passive systems still deliver effective pain relief, but they may require more frequent icing sessions or longer elevation periods to approach the same swelling control.
Expert Tip: Raise the injured limb above heart level during cold compression to maximize fluid drainage and pain relief.
The difference in range of motion at two weeks is often the first tangible milestone patients notice. Gaining flexion earlier can make daily tasks like sitting in a chair or navigating stairs feel less daunting.
However, the strongest predictor of a full return to activity is not the device you choose. It’s your consistency with physical therapy and movement retraining.
The potential 1–2 week head start that active compression may provide is helpful, but it only matters if you do the work.
You probably still have questions. Here are the ones readers ask most often, with straight answers.
Conclusion and Final Recommendations
Key Takeaways
- Active cold compression with intermittent pneumatic compression delivers superior swelling reduction and pain relief especially after major orthopedic surgery. The evidence from 2024-2026 consistently shows faster gains in range of motion and muscle recovery when motorized systems are used.
- Passive cold compression remains a cost-effective, portable and clinically valid choice for mild-to-moderate injuries. A simple ice pack and elastic wrap still work when the injury doesn’t demand aggressive fluid movement.
- Safety is non-negotiable. Always use a barrier between the cold source and your skin, respect session limits and check your skin frequently. No device replaces good judgment.
As you narrow down your options, remember that choosing the right recovery system is about matching the device to your procedure rather than chasing the most expensive technology. Established medical brands remain popular in hospitals and rehabilitation clinics, while newer home-recovery brands such as FeelGoodEase focus on making cold therapy more accessible for everyday use. Regardless of the brand you choose, prioritize consistent cooling performance, comfortable anatomical wraps, dependable replacement parts, simple operation and support that fits your long-term recovery needs.
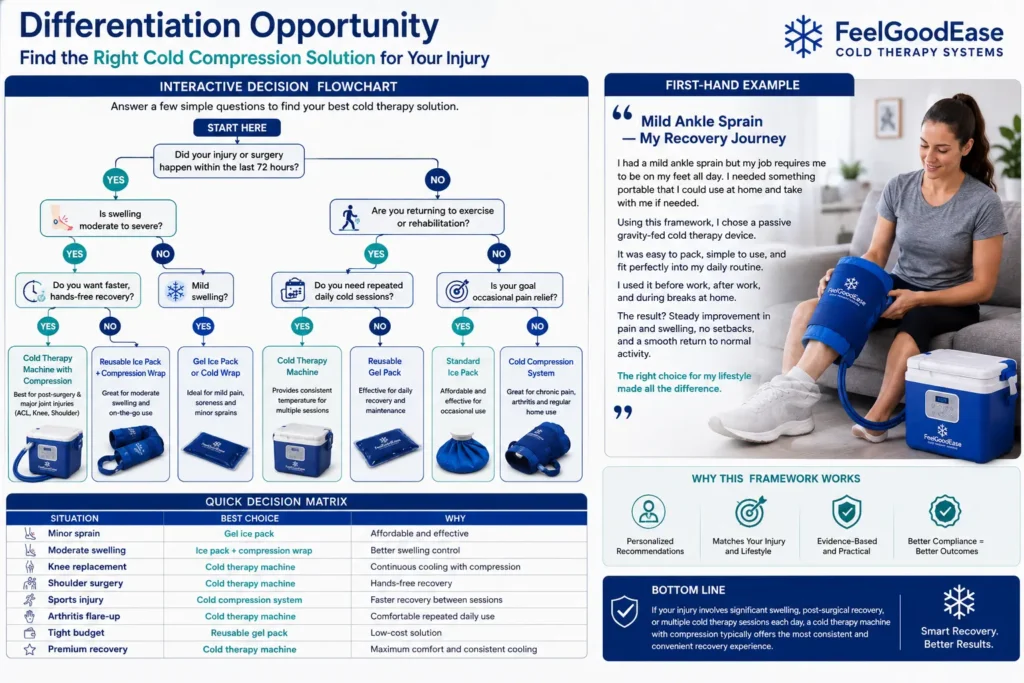
The Cold Compression Decision Framework
You don’t need a generic recommendation. You need a choice that fits your body, your finances and your daily reality. Walk through these three questions.
1. What is the severity of your injury?
Major surgery or severe swelling that limits movement? An active system with intermittent compression is your strongest clinical ally. Mild sprains, chronic aches or post-workout soreness? A passive gravity-fed device or a simple cold pack plus compression wrap will serve you well.
2. What is your budget?
A tight budget doesn’t mean poor care. A reusable cold pack and an elastic bandage cost very little and still reduce edema. If you can afford a rental or purchase, an active device may speed your return to normal life, but only if the injury severity justifies the expense and a cold therapy machine buying guide can help you weigh your options.
3. What is your lifestyle?
Need to ice while chasing a toddler or commuting? A portable, gravity-fed system fits a life in motion. Resting at home and want a set-and-forget solution? An electric pump that cycles cold water while you raise is a genuine recovery multiplier.
Recovery is not one-size-fits-all. The right device is the one that aligns with your injury, your resources, and the way you actually live. Talk to your healthcare provider, weigh the evidence and choose what fits your body, budget and goals.
Medical Disclaimer: This article is for informational purposes only and does not constitute medical advice. Always consult your healthcare provider before starting any new treatment.
Frequently Asked Questions
How long should I use cold compression after surgery?
The first 48 hours are non-negotiable for most protocols. Apply cold compression as continuously as you can tolerate, typically cycling 20 to 30 minutes on and at least 20 minutes off to protect your skin. After that, the goal shifts from aggressive swelling control to pain management and mobility. Many surgeons recommend continuing for 2 to 6 weeks, tapering down as swelling subsides and you transition to active rehab. Listen to your body. If your knee still feels warm and puffy after a physical therapy session, a 20-minute session is still doing real work. The device is a tool, not a timer.
Can you sleep with a cold compression device?
No. This is one of the few hard rules. Falling asleep with a running device removes your ability to monitor skin temperature and sensation. Even with a barrier layer, prolonged cold exposure can cause nerve or tissue damage. Set yourself up for a session right before bed, then remove the wrap and let your limb rest. If nighttime swelling is a persistent issue, talk to your doctor about raising the limb or adjusting your daytime protocol instead.
Can I combine cold therapy with heat therapy?
Yes, but timing matters. Cold constricts blood vessels and limits swelling. Heat increases blood flow and can loosen stiff muscles. Using them back-to-back without a plan can confuse your body’s healing signals. A common, safe sequence: apply cold after activity or exercise to calm inflammation, then use heat hours later or the next morning to ease muscle tightness. Never apply heat to a fresh injury or a joint that is still visibly swollen. When in doubt, stick with cold.
How do I clean and maintain my device?
Expert Tip: Wipe down wraps and pads with a mild disinfectant after each use and let them air dry completely to prevent bacterial growth. For motorized units, empty and rinse the water reservoir at least weekly. Check the tubing for kinks or mold. Most passive gravity-fed systems need only a quick wipe of the exterior and a periodic flush of the cooler with warm, soapy water. Always unplug the pump before cleaning. A clean device is a safer device, especially when it sits against healing incisions.
Will my insurance cover a cold compression device?
Coverage depends entirely on your plan. Many insurers consider cold compression devices durable medical equipment under billing code E0218. Some plans cover rental after major joint surgery. Others deny it as a comfort item. Always call your insurance provider first. Ask specifically about code E0218, whether rental or purchase is covered, and what documentation your surgeon needs to submit. Don’t assume a denial is final. A well-written letter of medical necessity from your doctor can sometimes overturn it. Let’s bring everything together into a clear decision you can act on today.
