
🚚 Free Shipping (3-5 Business Days) | 🛡️ 30-Day Money-Back Guarantee | 🏆 6-Month Warranty | ⭐ Trusted by 1000+ Happy Customers
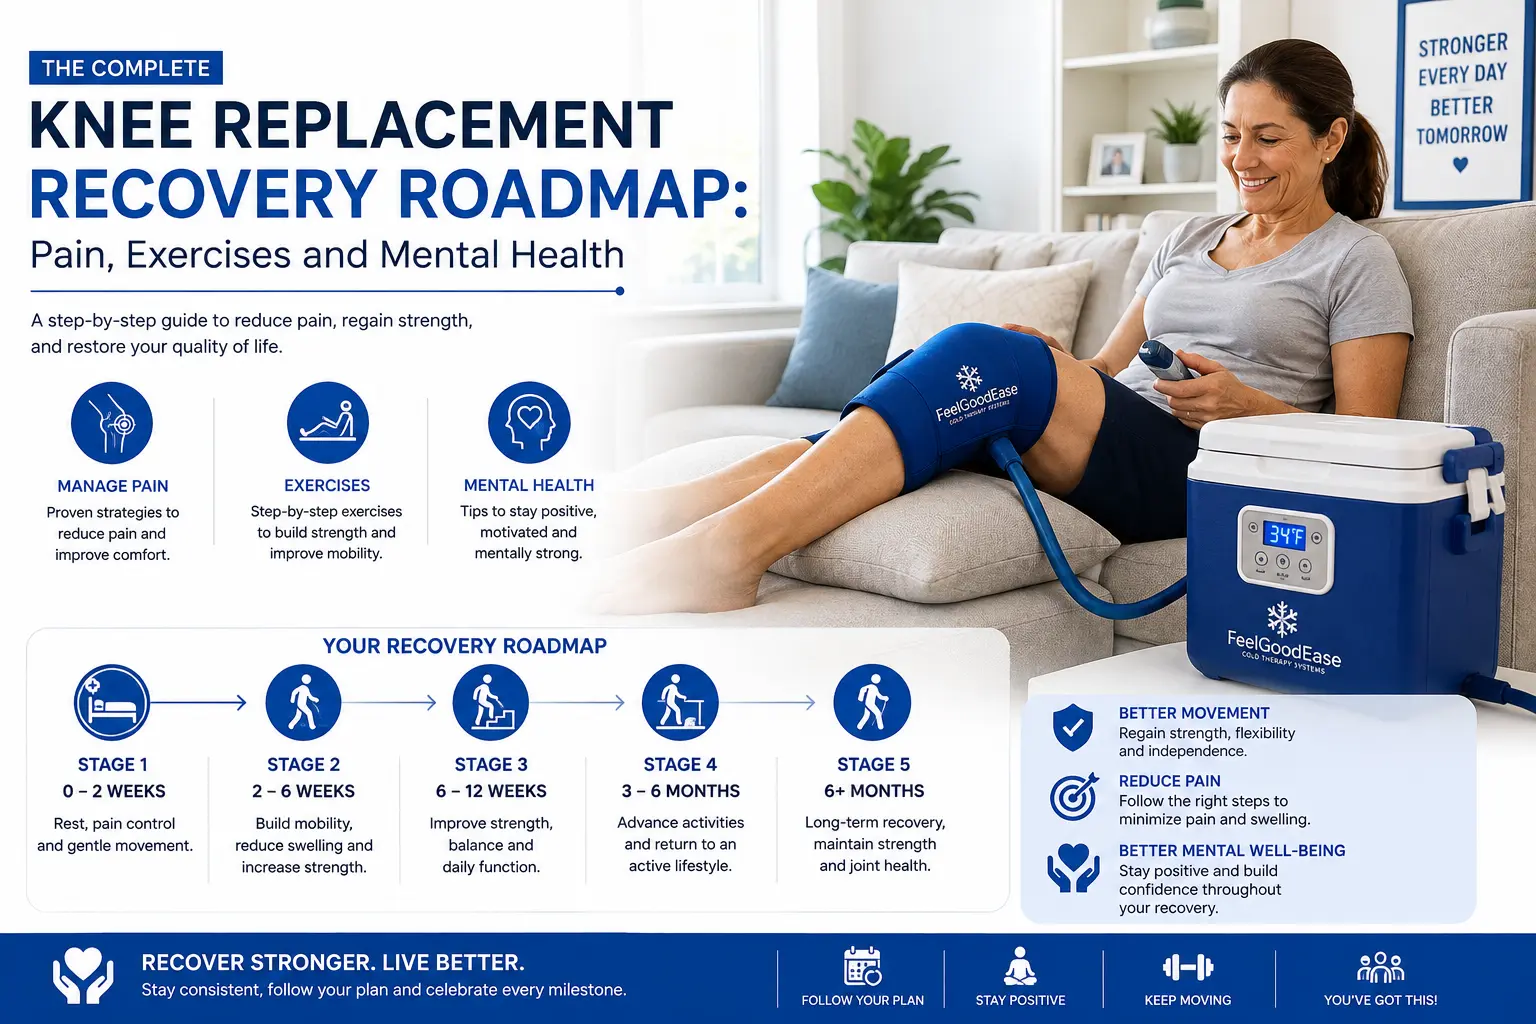

Knee Replacement Recovery: Your Week-by-Week Guide from Day 1 to Week 12
You wake to a heavy, numb limb and a flood of Did I make the right choice? The monitors beep a steady rhythm, the bandage feels impossibly bulky and the fear is real. Standing beside a patient who couldn’t stop crying, her new knee hidden under that same bulky bandage, I realized that after seeing that same fear in hundreds of the 700,000 knees replaced each year, I had to stop treating just the joint and start treating the person.
Recovery is a mental marathon as much as a physical one and avoiding common recovery mistakes can make the journey smoother. Pain is not a sign of failure: it’s a predictable part of healing you can manage.
Key Takeaways
- You’re not alone: over 700,000 Americans have this surgery each year and the emotional ups and downs are a normal part of healing.
- Pain is predictable, not a sign of failure and it’s manageable with the right combination of strategies.
- This guide gives you a week-by-week roadmap, so you know exactly what to expect from the recovery room to your first steps without a walker.
- Your mental recovery is just as important as your physical one and we’ll show you how to navigate both.
- With the right preparation and support, you’ll be back to the activities you love sooner than you think.
The next section lays out your week-by-week recovery at a glance, so you always know what to expect.
Week-by-Week Recovery Timeline: Your Roadmap from Day 1 to Week 12
Before diving into the details, here’s your recovery at a glance. The hospital’s “walk on day one” promise sounds like a marketing line, but the reality is a shuffle to the bathroom that leaves you drenched in sweat. Early mobilization is critical (AAOS and ERAS guidelines back it), but it’s not a victory lap. The table below sets realistic expectations so you can measure progress in small, weekly gains, not daily leaps.
| Week | Goals | Exercises & Activity | Precautions | Milestones |
|---|---|---|---|---|
| Week 0 (Pre-Surgery) | Prepare your home and body | Prehab: quad sets, ankle pumps, glute squeezes | Remove tripping hazards, arrange help for the first week | Surgery scheduled, home set up safely |
| Week 1 | Control pain and swelling, begin gentle motion | Ankle pumps, quad sets, heel slides, short walks with a walker | Raise leg above heart, ice frequently, watch for calf pain or swelling | Sit at edge of bed, stand with assistance, Aim for 0–30° knee flexion |
| Week 2 | Increase knee bending, reduce swelling | Heel slides, seated knee bends, straight leg raises, walking with walker or cane | No pivoting on the operated leg, avoid low chairs | Aim for 90° flexion, straight leg raise without lag |
| Weeks 3–4 | Improve walking pattern, wean off the walker | Stationary bike (no resistance), step-ups, balance exercises | Avoid kneeling, no heavy lifting | Walk with a cane, climb stairs with a rail |
| Weeks 5–6 | Build strength, return to light daily activities | Resistance band exercises, longer walks, stationary bike with light resistance | No high-impact moves, no twisting | Drive (if left knee and automatic), return to desk work |
| Weeks 7–12 | Regain full function, resume hobbies | Progressive strengthening, walking program, swimming | Listen to your body: swelling and fatigue are still normal | Walk unaided, return to golf or cycling, full range of motion |
Aim for 2–3 exercise sessions daily, unless your PT directs otherwise. Continue ankle pumps, stay hydrated and watch for calf pain or swelling to prevent blood clots.
Now, let’s tackle the number one fear: pain.
Pain Management Strategies: Staying Comfortable and in Control
Pain is the biggest worry after surgery, but you have more control than you think. The goal is to keep pain at a level where you can rest, do your exercises and move forward, not to eliminate every ache and cold therapy for pain relief is a cornerstone of that approach. A modern, layered approach makes that possible.
Understanding Your Pain Relief Options
Multimodal analgesia means using several types of pain relief together each working in a different way including cold therapy for arthritis pain, which can reduce swelling and discomfort without medication. A typical plan combines a nerve block placed during surgery, scheduled acetaminophen, a non-steroidal anti-inflammatory (NSAID), and an opioid only as a backup. This layered strategy provides effective relief and often lets you need far less opioid medication, or none at all.
Scheduled dosing is the engine that keeps pain predictable. Taking medication at set times, not just when the pain spikes, prevents the severe peaks that make therapy feel impossible. Staying ahead of pain is far easier than chasing it.
Expert Tip: Take your pain medication about 30-45 minutes before physical therapy to make exercises more comfortable and safely push your range of motion.
As the days pass, you’ll taper the strongest medications first. Most people step off opioids within the first week or two, but your timeline may differ. Your surgeon will give you a clear tapering schedule. Follow it. Stopping abruptly can cause a rebound pain flare.
The Power of Ice and Elevation
Ice and elevation aren’t just comfort measures. They actively shrink swelling, which directly lowers pain without a single pill. Cold therapy, whether active or passive cold compression, constricts blood vessels, slowing the inflammatory rush to the knee. Elevation above the heart uses gravity to drain fluid.
A patient once asked me, “Will the pain ever let up enough to sleep?” She was three days out, exhausted and the ice packs kept sliding off. I loaned her a cold therapy machine with a wrap-around pad and showed her how to set it on a wedge pillow.
She set phone alarms for her scheduled acetaminophen and iced in 20-minute cycles. Two days later she told me, “I’m not pain-free, but I’m in charge of it now.” That shift from crisis to routine is what we’re after.
Product Recommendation: A cold therapy machine with a wrap-around pad provides consistent cooling and is easier than swapping ice packs; see our buying guide for what to look for and pair it with a wedge pillow for optimal elevation.
Practical tip: ice for about 20 minutes at a time, several times a day, the right icing duration makes a difference and always keep a thin cloth between the pad and your skin. Raise with the knee fully straight, not bent over a pillow, to protect your extension.
Non-Medication Pain Relief Techniques
Pain and anxiety feed each other. Breaking that cycle gives you a sense of control that medication alone can’t provide. Diaphragmatic breathing is the simplest tool. Breathe in slowly through your nose, let your belly rise, and exhale longer than you inhaled. Do this for about two minutes before an exercise set and the tension in your whole body drops.
Distraction works. A podcast, a familiar show, or a guided imagery track can pull your brain’s attention away from the knee just enough to get through a tough icing session or a restless night. Gentle, non-weight-bearing movement like ankle pumps and quad sets also eases stiffness and signals your nervous system that it’s safe to relax.
Once pain is under control, it’s time to move. The next section is your exercise library.
Physical Therapy Exercise Library: Your Step-by-Step Movement Guide
With pain under control, movement is your best medicine. These exercises are your daily non-negotiables and cold therapy for rehabilitation supports your progress.
Three short sessions a day. That was the number I wrote on a sticky note for a patient who was pushing through hour-long torture sessions. Once we dialed in frequency over duration, his swelling dropped and flexion came faster. Consistency beats intensity every time. Use a mirror to check your form, because small misalignments build compensation patterns that slow you down. Progress phases based on control and pain, not just the calendar.
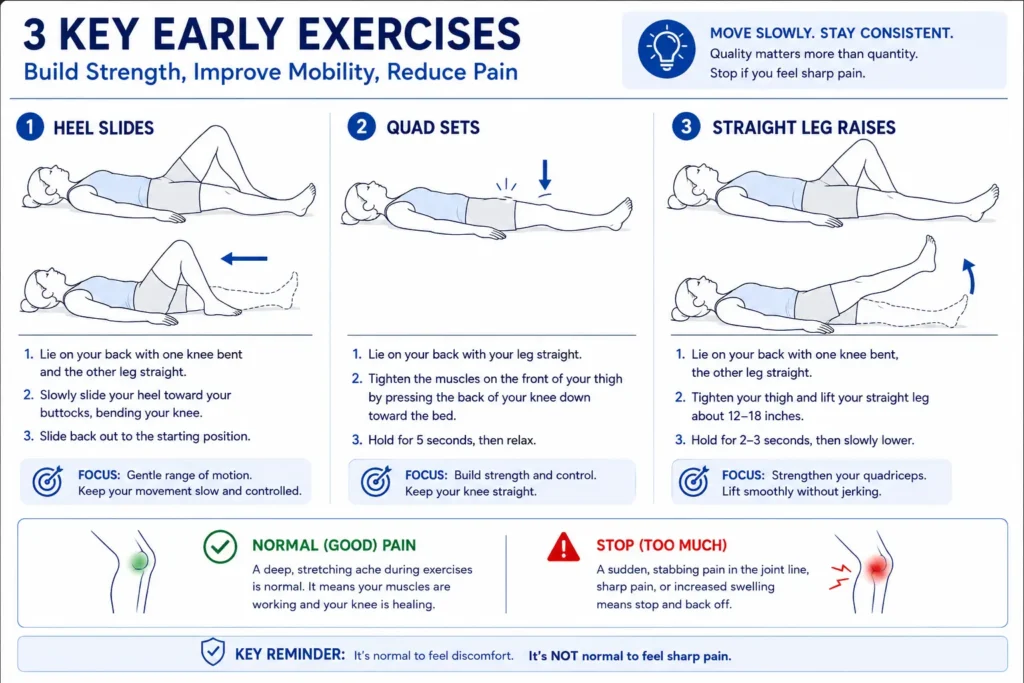
Early Phase Exercises (Weeks 1–2)
Ankle pumps every waking hour dramatically reduce swelling and DVT risk. Do them while you ice or watch TV. Quad sets: press the back of your knee into the bed, tightening the thigh. Hold 5 seconds, release. Heel slides: slide your heel toward you, bending the knee as far as you can without sharp pain. Straight leg raises: tighten the quad, then lift the leg a few inches off the bed.
Expert Tip: If you can’t lift your leg at first, don’t panic. Quad sets will wake up the muscle and the ability to lift usually returns within the first week or so.
Intermediate Phase Exercises (Weeks 3–6)
Short-arc quads: place a rolled towel under your knee and straighten the leg. Calf raises: hold a counter, rise onto your toes. Mini-squats: sit back as if to a chair, keeping your weight in your heels. Stationary bike: start with the seat high and no resistance; lower the seat as flexion improves.
Advanced Phase Exercises (Weeks 7–12)
Step-ups onto a low step, leading with the surgical leg. Lateral step-ups to build hip stability. Single-leg balance near a wall. Forward lunges with a shortened stride. Sport-specific drills like lateral shuffles or gentle cutting, only when your therapist clears you.
These exercises mirror the protocols used at leading orthopedic centers like OHSU and Brigham and Women’s. Before you start exercising, make sure your home is set up for safety. Here’s your checklist.
Home Setup and Safety Checklist: Prepare Before You Arrive
A safe home is the foundation of a smooth recovery. Do this prep work before surgery.
Essential Modifications and Assistive Devices
Clear wide, clutter-free pathways. Remove throw rugs, secure cords, and rearrange furniture so your walker has enough room. Set up a one-level recovery station: a bedside table stocked with your phone, charger, medications, water, and snacks. You’ll move less. Bathroom safety is non-negotiable. Install grab bars, use a raised toilet seat, and set up a shower chair with a handheld showerhead. Choose slip-resistant, closed-back shoes and loose, elastic-waist clothing you can put on without bending.
Product Recommendation: A long-handled grabber tool and a shower chair with a back and armrests are essential for safe, independent daily tasks.
I thought the grabber tool was just for picking up dropped items. Then I realized it could also help me pull on my pants without bending or adjust a blanket without twisting my knee. That simple tool became my most-used device, far beyond what the packaging suggested.
Expert Tip: Do a dry run before surgery: walk through your home with a walker to spot tight areas, and practice using the toilet and shower with your new equipment to reduce anxiety.
Assistive Device Checklist
- Walker
- Cane
- Raised toilet seat
- Shower chair
- Grab bars
- Grabber tool
- Wedge pillow
- Cold therapy unit
- Slip-on shoes
- Loose clothing
Even with the best setup, complications can happen. Next, learn the red flags you must never ignore.
Red Flags: When to Call Your Surgeon or Seek Immediate Help
Knowing what’s normal and what’s not can save your life and understanding contraindications for cryotherapy is part of staying safe during recovery. Here are the red flags you should never ignore. After a patient called with calf pain on a Sunday afternoon, I was grateful for the AAOS guidelines that had shaped our clinic’s post-op protocols for years. That call, seven years into my practice, reminded me that early mobilization and vigilant monitoring aren’t just checkboxes: they’re the difference between a scare and a tragedy.
Signs of Infection
Watch for spreading redness, increased warmth, new or worsening swelling, cloudy drainage from the incision, or a fever (usually above 100.4°F / 38°C). Chills are a red flag too. Infection can escalate quickly, so call your surgeon at the first sign.
Signs of a Blood Clot (Deep Vein Thrombosis or Pulmonary Embolism)
A clot in the leg (DVT) often causes sudden calf pain, swelling, or tenderness. If a clot travels to the lungs (PE), you may feel sudden shortness of breath, sharp chest pain, or cough up blood. Call 911 immediately.
Other Urgent Concerns
Sudden, severe pain that medication doesn’t touch, a new inability to lift your foot (foot drop), a popping sensation in the knee, or chest pain with palpitations all warrant an urgent call. When in doubt, call your surgeon’s office. It’s always better to check than to ignore a potential problem.
Your body also needs the right fuel to heal. Here’s how nutrition speeds recovery.
Nutrition and Hydration for Healing: Fuel Your Recovery
Surgery is a major trauma to your body. The right nutrition can speed healing and fight fatigue. In the clinic, we see the same pattern every week: a patient who can’t stomach a full meal but needs protein to heal. That’s why we focus on small, nutrient-dense choices.
Key Nutrients and Where to Find Them
Protein is the building block for tissue repair. Aim for roughly 1.2 to 1.5 grams per kilogram of body weight daily. Eggs, Greek yogurt, chicken, fish, beans and protein shakes are all solid sources.
Vitamin C and zinc support collagen formation and immune function. Citrus fruits, bell peppers, strawberries and nuts are easy to add.
Vitamin D and calcium work together for bone healing. Get vitamin D from fatty fish, fortified milk or a supplement if your levels are low. Calcium comes from dairy, leafy greens and fortified alternatives.
Iron helps rebuild red blood cells after surgery. Lean red meat, spinach and lentils are good choices.
Fiber keeps your digestive system moving, especially when pain medications slow things down. Whole grains, fruits, vegetables and legumes are your friends.
Expert Tip: Sip water consistently throughout the day, aiming for about 8-10 cups, to combat fatigue and constipation, especially if using a cold therapy machine that increases urination.
Sample Day of Eating for Recovery
Here’s a concrete plan that prioritizes healing nutrients without overwhelming a queasy stomach.
- Breakfast: Scrambled eggs with spinach and a slice of whole-grain toast. A small glass of orange juice for vitamin C.
- Snack: Greek yogurt with a handful of berries and a sprinkle of nuts.
- Lunch: Chicken and vegetable soup with a side of whole-grain crackers. The broth helps with hydration.
- Snack: A high-protein smoothie: blend milk or a milk alternative, a scoop of protein powder, a banana, and a spoonful of peanut butter. This is a lifesaver when pain meds kill your appetite.
- Dinner: Baked salmon with roasted sweet potatoes and steamed broccoli. Salmon gives you protein and vitamin D.
- Evening: A small bowl of cottage cheese or a glass of warm milk to support overnight repair.
Healing isn’t just physical. The next section addresses the emotional side of recovery.
Emotional Well-Being and Mental Health: The Hidden Side of Recovery
It’s normal to feel down, frustrated, or even angry. Acknowledging this is the first step to coping.
The emotional crash after knee replacement is more predictable than the physical one. A senior PT I trained under used to say, “Week three is when the tears come.” She’d seen it in hundreds of patients, and the research backs her up: up to 20% of joint replacement patients experience significant depressive symptoms. That’s not weakness. It’s a predictable response to pain, dependency, and a body that won’t cooperate.
Common Emotional Challenges by Phase
The emotional arc of recovery is as real as the surgical scar. In weeks 1–2, dependency blues hit hard. You need help for basic tasks, and the pain can feel relentless. By weeks 3–6, frustration and comparison creep in. You’ll see others bending further or walking sooner, and your own progress feels glacial.
Weeks 7–12 bring impatience and a nagging fear of re-injury. You’re stronger, but every twinge makes you wonder if you’ll ever move without thinking about the knee.
Practical Coping Strategies
Small, daily shifts can pull you out of the mental fog. Set micro-goals: not “walk more,” but “stand at the counter to make coffee.” Journaling for just two minutes a day helps you see progress you’d otherwise miss. Mindfulness, even a single deep breath before each exercise, cuts the anxiety spiral. Peer support groups, whether online or in person, are a lifeline.
Hearing someone say “I felt exactly that” normalizes the struggle and teaches you what comes next. And accept help. Letting someone fetch your ice pack isn’t failure; it’s fuel for healing.
For Caregivers: How to Support Without Burning Out
Your role is vital, but you can’t pour from an empty cup. Listen without trying to fix. A simple “this is really hard” goes further than forced optimism. Encourage effort, not just outcomes. Celebrate the first time they get into the car independently, even if the bend isn’t perfect. Take breaks. A 20-minute walk or a phone call with a friend resets your patience.
Know the red flags: persistent withdrawal, refusal to eat, or talk of hopelessness means it’s time to loop in the medical team.
As your strength and mood improve, you’ll start wondering: when can I get back to my life? The next section has answers.
Return to Activities Timeline: When Can I Get Back to My Life?
You’ve done the hard work. Now, when can you reclaim your normal life?
Driving:
Typical clearance 4-6 weeks left, 68 weeks right must be off narcotics and able to brake.
Can you stomp the brake without hesitation? That’s the real question. In the clinic, I watch for the moment a patient moves their foot from gas to brake without a flinch. If they brace for pain or hesitate, they’re not ready. That’s the tell, not the calendar.
The narcotics have to be out of your system and you need to be able to perform an emergency stop. That’s the standard we use. After a left knee replacement most people get the green light around 4 to 6 weeks.
A right knee takes longer, typically 6 to 8 weeks because it’s your braking leg.
Work:
Desk job remote 2-3 weeks, in-office 4-6 weeks, physical job 8-12 weeks.
Returning to work depends on what your day actually demands. A remote desk job can often resume in 2 to 3 weeks, once you can sit comfortably and think clearly off narcotics. An in-office desk job adds a commute and more sitting, so plan on 4 to 6 weeks. If your work is physical, lifting, standing, walking all day, you’re looking at 8 to 12 weeks and a phased return is smart.
Sexual Activity:
Resume when comfortable usually 4-6 weeks avoid knee-stressing positions.
You can resume sexual activity when you feel ready, typically around 4 to 6 weeks. The key is comfort and avoiding positions that twist or put direct pressure on the surgical knee. Listen to your body; if it hurts, stop and try a different position.
Sports and Recreation:
Walking, swimming, golf, tennis, high-impact activities with specific timelines and the 10% rule.
Walking and swimming are your early wins, often starting within weeks. For golf, expect a return around 12 to 16 weeks; tennis, closer to 4 to 6 months. High-impact activities like running or basketball are generally discouraged because they accelerate implant wear.
Expert Tip: Increase any activity by no more than 10% per week; if swelling or pain increases, scale back and ice.
Still have questions? The FAQ section tackles the ones we hear most often.
Interactive Recovery Milestone Tracker: Celebrate Every Win
Print this tracker and stick it on your fridge. Checking off each box is a victory. I expected a checklist to feel like a chore, but seeing those first few boxes checked off gave me a surprising boost. It turned recovery into a series of small wins I could actually see. This is your personal celebration tool, not a race against anyone else’s timeline.
Week 1
- Bend knee to 90° with help
- Get out of bed independently
- First shower with a chair
Week 2
- Walk to the bathroom without a walker
- Straighten leg fully on the bed
- Sleep more than 4 hours straight
Week 3
- Walk to the mailbox and back
- Bend knee past 100° on your own
- Prepare a simple meal standing
Week 4
- Drive short distances (if cleared)
- Climb stairs foot-over-foot
- Notice less pain at rest
Week 6
- Walk a full block without stopping
- Bend knee to 120° or more
- Return to a hobby you love
Share your checked-off milestones with a support buddy. It reinforces how far you’ve come, especially on days when progress feels slow.
Finally, a word of encouragement as you move forward.
A Final Word on Your Recovery
You’ve made it through the hardest part. Recovery is a marathon, not a sprint. Setbacks don’t erase progress. Lean on your support. Asking for help is strength. The pain is temporary and purposeful. We thought the exact degree of flexion would matter most, but the real wins were quieter: a night without waking, a laugh with a friend.
Celebrate every small win. Trust the process. Thousands have reclaimed active lives. Your next step: pick one win from today and mark it down.
Frequently Asked Questions
How can I manage pain after knee replacement surgery?
Use a multimodal approach: a nerve block, scheduled acetaminophen and NSAIDs, and opioids only as backup. Ice and elevation reduce swelling and pain. Take medication 30-45 minutes before physical therapy, and stay ahead of pain with scheduled dosing.
When can I drive after knee replacement?
Typically 4-6 weeks for left knee, 6-8 weeks for right knee. You must be off narcotics and able to perform an emergency stop without hesitation.
What exercises should I do in the first week?
Ankle pumps every hour, quad sets, heel slides and short walks with a walker. Aim for 2-3 sessions daily, and stop if you feel sharp pain.
Is it normal to feel depressed after knee replacement?
Yes, up to 20% of patients experience significant depressive symptoms. Emotional ups and downs are a predictable part of recovery. Coping strategies include setting micro-goals, journaling, and joining peer support groups.
How long does a knee replacement last?
Modern knee implants often last 15-20 years or more with proper care. High-impact activities are discouraged to avoid accelerated wear.
