
🚚 Free Shipping (3-5 Business Days) | 🛡️ 30-Day Money-Back Guarantee | 🏆 6-Month Warranty | ⭐ Trusted by 1000+ Happy Customers

Ice Therapy Timing: When to Ice, When to Stop, and What to Do Instead
You twist your ankle on a trail run or your child takes a tumble in the backyard. Instinct says grab an ice pack. But then the doubts creep in for how long? Should you even use ice at all? One friend swears by the old RICE method, while another forwards an article claiming ice delays healing. The conflicting advice can leave you frozen unsure whether you are helping or hurting your recovery.
That confusion has a source. Dr. Gabe Mirkin, who introduced the RICE acronym (Rest, Ice, Compression, Elevation) in 1978, publicly retracted the “I” and the “R” in 2014. He acknowledged that ice and complete rest might actually slow the body’s natural repair process. Yet many clinics and first-aid guides still recommend ice as a go-to tool. So where does that leave you, sitting on the sideline with a swollen joint and a bag of frozen peas?
This article cuts through the noise and our cold therapy machine buying guide helps you choose recovery equipment. We will give you a clear, evidence-based plan that respects both the real benefits of ice therapy and its limits.
You will learn exactly when ice helps (hint: it is about pain and swelling control in the first 48 hours not about speeding healing) and when to put it away.
We will walk you through how to use a cold therapy machine safely by paying attention to what your skin tells you.
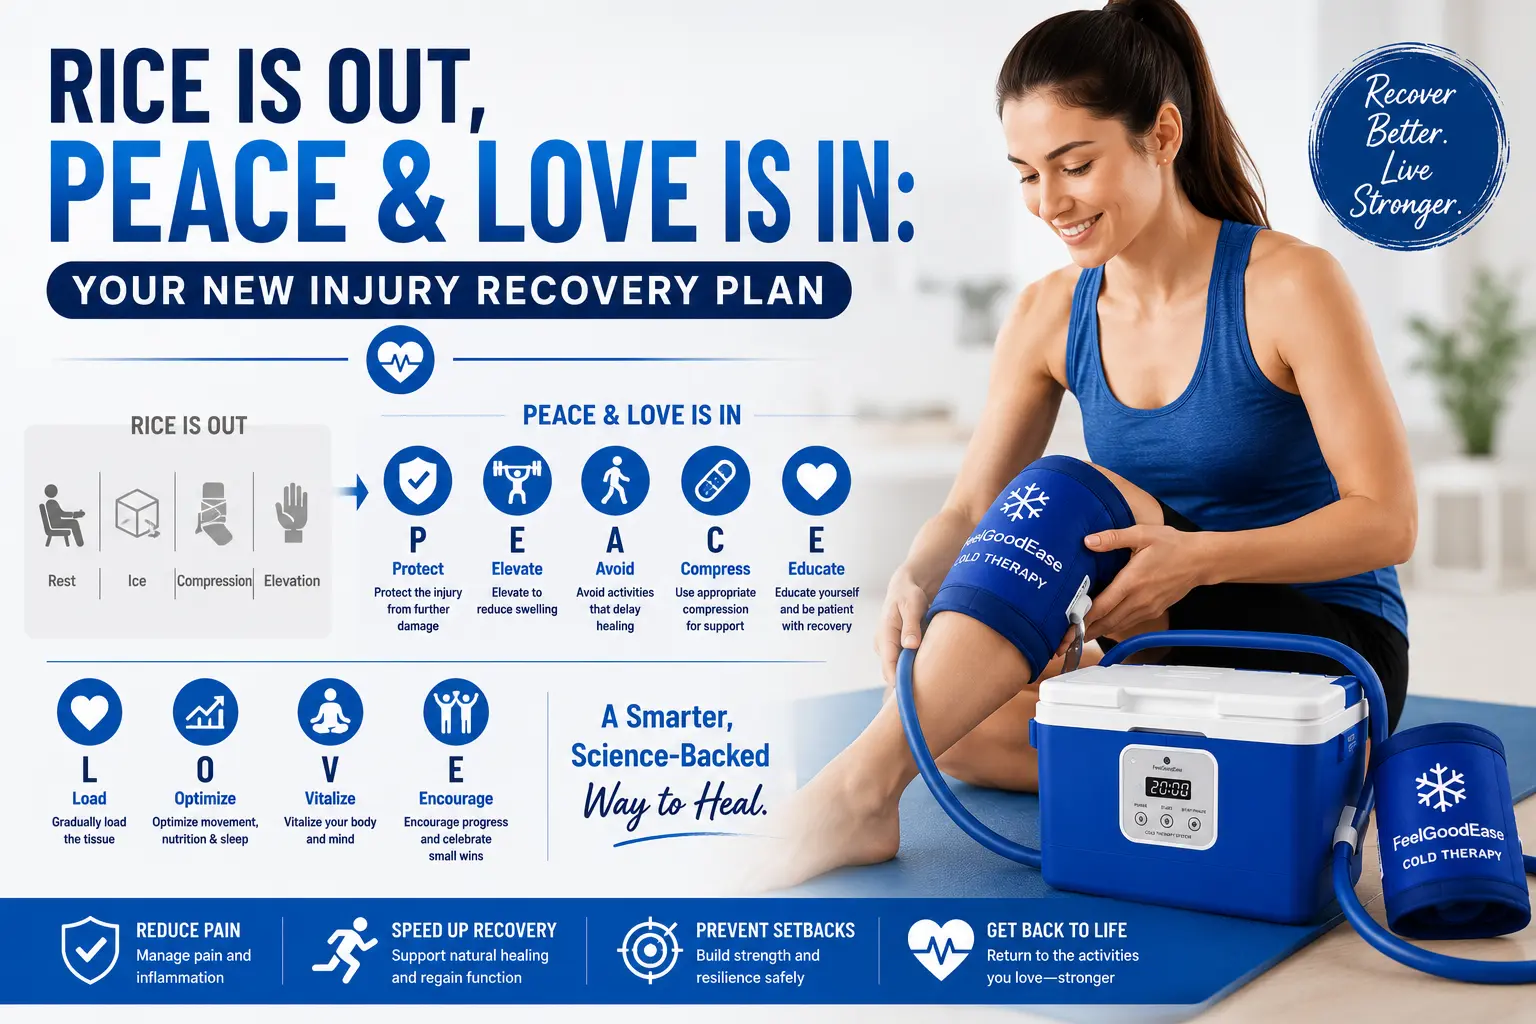
And we will show you how to transition from the acute phase into active recovery, guided by the PEACE & LOVE protocol, so you can get back to moving with confidence.
Key Takeaways
- Ice helps manage pain and swelling in the first 48 hours but it doesn’t speed healing.
- Use short, intermittent icing with a cloth barrier: stop when the area feels numb (CBAN method).
- After the acute phase, prioritize gentle movement and heat over ice.
- The PEACE & LOVE protocol guides your full recovery.
- Seek medical attention if you can’t bear weight, have severe pain, or notice signs of infection.
By the end, you will have a step-by-step guide to manage your injury with clarity not confusion. Now, let’s understand the science behind icing so you know why these guidelines work.
What Happens When You Ice an Injury? The Science of Cryotherapy
Before we get to the exact timing, it helps to understand what ice actually does to your body. The sensation is familiar cold then burning then a deep ache and finally numbness. But beneath the skin, a cascade of physiological events is unfolding.
The Immediate Effects: Vasoconstriction and Pain Relief
When you apply an ice pack, the cold triggers vasoconstriction, the narrowing of blood vessels in the area. The narrowed vessels reduce blood flow, limiting the fluid rush that causes acute swelling. It’s a mechanical brake on the initial inflammatory surge.
At the same time, the cold numbs the nerve endings. It slows the speed at which they transmit pain signals to your brain. This is why ice feels so good in the moment: it’s a temporary, local anesthetic. The relief is real. But it’s a symptom manager not a healer.
Expert Tip: A wet ice pack (ice cubes with water) cools tissues faster and more evenly than a dry gel pack.
How Ice Influences Inflammation and Healing: The Current Evidence
Here’s where the story gets more complex. Inflammation isn’t just a mistake your body makes. It’s the necessary first step in repair. Swelling brings in cells that clear debris and start rebuilding tissue. When you apply ice, you’re deliberately blunting that process.
Animal studies have shown that prolonged icing can actually impair muscle regeneration. A 2024 review in the British Journal of Sports Medicine found no human evidence that ice therapy improves tissue healing. In fact, the review highlighted that in animal models, extended cooling delayed recovery. This doesn’t mean ice is useless. It means we need to be smarter about when and why we use it.
The Debate: Does Icing Delay Recovery?
The question splits the field. On one side, researchers point to the lack of healing benefits and the potential to interfere with the body’s natural repair sequence. On the other, many clinicians see a clear role for ice in the very early stages, not to speed healing, but to control pain and limit secondary damage from excessive swelling.
The 2023 editorial in the International Journal of Sports Physical Therapy captured this middle ground: ice remains useful in the immediate acute stage, specifically the first 12 hours, with 20-30 minute intervals. The goal is to calm the storm, not freeze the repair crew.
Perhaps the most telling shift came from Dr. Gabe Mirkin, who coined the RICE protocol in 1978. In 2014, he publicly retracted it, acknowledging that both ice and complete rest can delay recovery. That retraction didn’t banish ice from the toolkit, but it forced a reckoning.
The current clinical consensus is one of judicious use: short, intermittent icing in the first hours after an injury, then a swift transition to active recovery.
With the science in mind, let’s see how injury care protocols have evolved to incorporate this understanding.
The Evolution of Injury Care: RICE vs. POLICE vs. PEACE & LOVE
Now that you know what ice does, let’s look at how expert recommendations have changed over the years. The advice you grew up with has been quietly rewritten.
A Brief History of Acute Injury Protocols
For decades, RICE (Rest, Ice, Compression, Elevation) was the unquestioned standard. Coaches, parents and doctors all repeated the same script: stop moving, apply ice, wrap it and prop it up. The goal was to minimize swelling and pain. Then, in 2014, the protocol’s own originator, Dr. Gabe Mirkin publicly retracted his cold therapy protocol. He acknowledged that complete rest and prolonged icing could actually delay healing by shutting down the body’s natural repair signals.
That retraction opened the door for POLICE, a subtle but important shift. POLICE replaced “Rest” with “Protection” and added optimal loading. The idea was to protect the injured area from further damage while introducing gentle, pain-free movement early on. Ice remained in the mix, but the focus moved from total stillness to guided activity.
PEACE & LOVE arrived next and it represents a more fundamental rethink. This protocol splits care into two phases. The acute phase (PEACE) still includes Protection, Elevation and Compression but it explicitly tells you to Avoid anti-inflammatories and prioritizes Education. Ice is no longer a core component. It’s only suggested for short-term pain relief.
The subacute phase (LOVE) then layers in Load, Optimism, Vascularisation, and Exercise. The entire framework pushes active recovery, lifestyle factors and a mindset shift away from passive waiting.
Comparison Table: RICE, POLICE and PEACE & LOVE
| Protocol | Components | Core Philosophy | When to Use |
|---|---|---|---|
| RICE | Rest, Ice, Compression, Elevation | Minimize swelling and pain through inactivity | Acute phase (first 24-48 hours); now considered outdated |
| POLICE | Protection, Optimal Loading, Ice, Compression, Elevation | Protect the injury while introducing gentle movement to stimulate repair | Acute and early subacute phases; replaces RICE |
| PEACE & LOVE | Protection, Elevation, Avoid anti-inflammatories, Compression, Education (PEACE); Load, Optimism, Vascularisation, Exercise (LOVE) | Active recovery and education; ice is limited to short-term pain relief only | PEACE for the acute phase; LOVE for the subacute phase and beyond |
What This Means for Your Recovery: Choosing the Right Approach
You don’t need to pick one protocol and stick to it forever. Think of them as a progression that mirrors your body’s healing stages.
Your priority in the first 48 hours is protection. The PEACE components fit well here. Ice can still help with pain but keep sessions short and intermittent. The old RICE advice to rest completely is no longer helpful. Even in the acute phase, some gentle, pain-free movement (optimal loading) can be beneficial if it doesn’t aggravate the injury.
Once you pass the 48-hour mark, the subacute phase begins. This is where LOVE takes over. You shift from protection to active recovery. Loading the tissue, staying optimistic and getting the blood flowing all become central. Ice should be phased out unless you have a specific flare-up of pain. The goal is to rebuild capacity not to numb the area indefinitely.
With the protocol evolution clear, let’s get to the specific numbers you came for: exactly how long to ice.
How Long to Ice: The Evidence-Based Answer
You’ve seen the protocols. Now here’s the precise timing that the latest research supports. Getting the duration and frequency right is what separates a helpful ice session from one that risks skin damage or delays your recovery.
The Golden Rule: 10-20 Minutes Per Session
A single icing session should last between 10 and 20 minutes. This window is long enough to reduce pain and limit swelling through vasoconstriction but short enough to protect your skin and nerves. Never exceed 20 minutes. Beyond that, you risk frostbite, nerve injury or a rebound effect where blood vessels dilate and actually increase swelling. The goal is to cool the tissue not freeze it.
Expert Tip: Use the CBAN method to time your session: remove the ice when you reach the Numb stage (typically 10-20 minutes).
Frequency: Every 2–3 Hours in the First 24–48 Hours
During the first two days after an acute injury, aim to ice every 2 to 3 hours while you’re awake. This consistent rhythm keeps the inflammatory response in check without overdoing it. You don’t need to set an alarm through the night; your body’s healing processes need uninterrupted rest, too.
Product Recommendation: An interval timer app (e.g., Interval Timer, Seconds Pro) helps track icing and rest periods accurately especially when pain is distracting.
The First 12 Hours: A Critical Window for More Frequent Icing
The immediate hours after an injury are when secondary tissue damage can spread beyond the initial impact. This is where your cold therapy machine earns its keep. Research supports more frequent icing during this narrow window, with sessions every 2 hours for 20 to 30 minutes at a time. The aim is to limit that secondary damage by keeping metabolic activity low and reducing the inflammatory cascade.
After those first 12 hours, you can settle into the standard 10-20 minute sessions every 2 to 3 hours for the remainder of the acute phase.
After 48 Hours: When to Reduce or Stop Icing
Once you’re past the 48-hour mark, the role of ice changes. Persistent swelling at this stage is rarely helped by additional icing. In fact, continued icing can slow the natural healing process by restricting blood flow that should now be delivering repair cells. Instead, shift your focus to gentle, pain-free movement and compression. This is where the PEACE & LOVE protocol’s emphasis on optimal loading becomes your guide.
Expert Tip: After 48 hours, prioritize gentle, pain-free movement (optimal loading) over continued icing to promote healing as recommended by the PEACE & LOVE protocol.
Now that you know the timing, let’s walk through exactly how to apply ice safely, step by step.
Step-by-Step Guide: How to Ice an Injury Safely
Timing is only half the battle doing it safely is just as important. Here’s your step-by-step guide.
Step 1: Prepare Your Ice Pack and Barrier
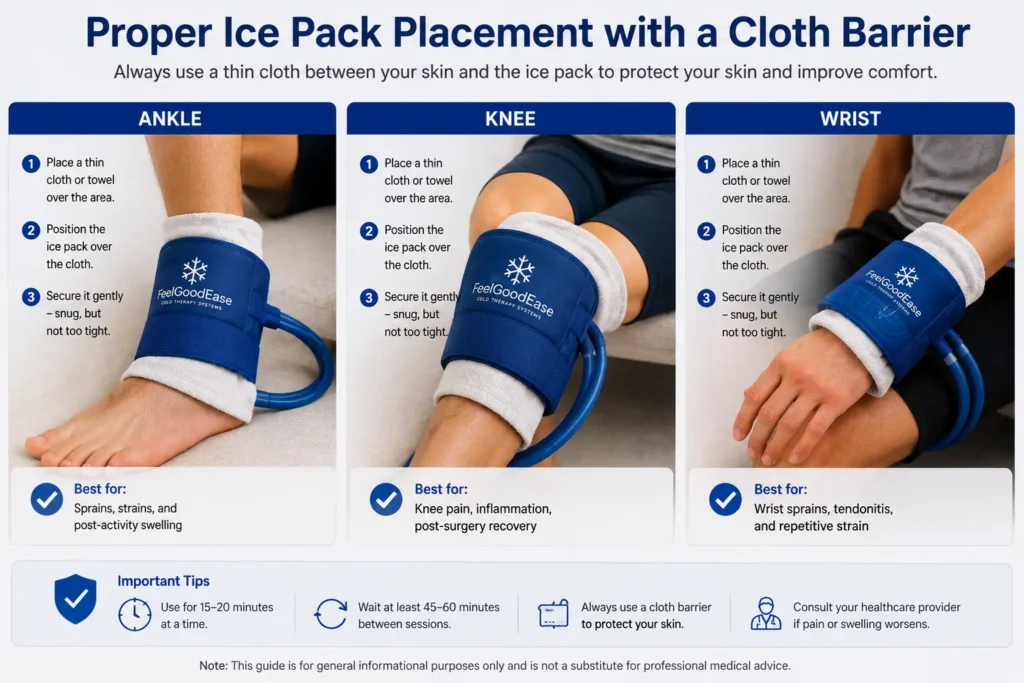
Grab a cold source. A reusable gel pack, a bag of crushed ice or even a bag of frozen peas all work. Whatever you choose never place it directly on your skin. Direct contact can cause nerve damage within minutes.
Expert Tip: A thin, dry cloth barrier, like a pillowcase or dedicated cover, prevents frostbite and should never be omitted.
Product Recommendation: For most home injuries, a reusable gel pack with a fabric sleeve offers safe even cooling for post-surgical needs, a cold therapy machine provides consistent temperature control.
Step 2: Position the Injured Area (Elevation and Compression)
Prop the injured limb above the level of your heart. This uses gravity to enhance fluid drainage effectively doubling the anti-swelling effect of the ice. A stack of pillows works but a dedicated elevation wedge keeps the limb stable and comfortable.
Product Recommendation: An elevation wedge or pillow keeps the injured limb comfortably above heart level, enhancing the anti-swelling effect of ice.
If your injury allows, add a light compression wrap. It should feel snug not tight. You want to support the area without cutting off circulation.
Step 3: Apply the Ice Pack Correctly
Place the wrapped pack or a knee wrap directly over the most painful, swollen spot. Don’t just drape it nearby. Secure it gently with your hand or a loose elastic bandage. Avoid pressing down hard. The goal is even contact not pressure.
Step 4: Use the CBAN Method to Time Your Session
Forget the clock for a moment. Your body gives you a clear signal. The CBAN method walks you through four predictable stages Cold, Burning, Aching and Numb. Remove the ice pack the moment you reach the Numb stage. That’s your definitive stop sign. It typically takes 10 to 20 minutes but the sensation, not a timer is what protects your skin.
Expert Tip: If you have diabetes, Raynaud’s or circulatory issues stop icing at the Aching stage to avoid cold-induced nerve or skin damage.
Step 5: Post-Icing Care and Monitoring
Take the pack off and gently pat the skin dry. Look at the area. It should be pink, not white or waxy. Check for any lingering numbness, blistering or unusual redness. This skin check is critical for anyone with reduced sensation or circulatory problems.
Now, give your tissues a full break. A two-hour off interval is essential. It allows complete rewarming and prevents the cumulative cold injury that can happen with back-to-back sessions. Rushing back to ice too soon does more harm than good.
Once you’ve mastered safe icing, you’ll need to know when to stop and switch to heat. That’s next.
When to Stop Icing and Transition to Heat
You’ve been icing diligently, moving through the cold, burning, aching and numb stages. But ice is a short-term ally not a long-term companion. At some point continuing to ice works against your recovery. Knowing when to put the ice pack away and reach for warmth is just as important as knowing how to ice in the first place.
The 48–72 Hour Rule: When Swelling Subsides
Ice therapy is most effective during the acute phase, the first 24 to 48 hours after injury, when swelling and inflammation are actively building. During this window, cold constricts blood vessels, limits fluid accumulation and numbs pain.
But once the swelling plateaus and the area no longer feels hot or throbs at rest, ice offers diminishing returns. Continuing to ice can delay healing by restricting the blood flow that damaged tissues now need to repair themselves.
This doesn’t mean you must stop at exactly 48 hours. Individualization is key. Research shows that the dose of cold therapy (its intensity, duration and timing) matters more than a rigid protocol. If the area is still puffy and warm, a few more icing sessions can help. But if pain or swelling worsens after 72 hours or you cannot bear weight, seek medical evaluation to rule out a fracture or severe ligament injury.
Expert Tip: If pain or swelling worsens after 72 hours or you cannot bear weight, seek medical evaluation to rule out a fracture or severe ligament injury.
Benefits of Heat Therapy for Later-Stage Recovery
Once the acute storm has passed, your body enters the subacute phase. Here, the goal shifts from limiting damage to promoting repair. Heat therapy becomes your tool of choice.
Applying warmth dilates blood vessels, increasing circulation to the area. This delivers oxygen and nutrients that fuel healing, while flushing out metabolic waste. Muscles relax, stiffness eases, and tissues become more pliable, ready for the gentle, pain-free movement that the PEACE & LOVE protocol calls active recovery.
Heat doesn’t just feel good. It prepares the injured site for optimal loading, the gradual reintroduction of movement that rebuilds strength without re-injury. A warm muscle stretches more safely. A warm joint moves more freely. This is the bridge from protection back to function.
How to Safely Switch from Ice to Heat
The switch isn’t about a clock. It’s about what you observe. Use a simple body-led rule: if the area is still swollen or throbbing, continue ice. If stiffness dominates and swelling is gone, it’s time for heat. Check the skin temperature with the back of your hand. A warm, non-tender area is ready for warmth. A cool, puffy one is not.
Start with moist heat, a warm towel or a heat pack wrapped in a damp cloth for 15-20 minutes. Never apply heat to an area that is still acutely inflamed as that can increase swelling. Never use heat on numb skin or while sleeping.
Product Recommendation: A reusable gel pack that can be heated or frozen offers a convenient way to transition between cold and heat therapy.
As you compare recovery tools, remember that no single device is right for every person. Trusted brands such as Breg, Aircast, Ossur and FeelGoodEase all offer solutions designed to provide more controlled cooling than traditional ice packs. When choosing a system, prioritize consistent temperature control, comfortable wraps, reliable replacement parts and ease of use rather than focusing only on price. A well-designed cold therapy system can make it easier to follow recommended icing schedules safely during the early stages of recovery.
Even with perfect timing common mistakes can undermine your recovery. Let’s make sure you’re not making them.
Common Icing Mistakes and How to Avoid Them
Now that you know when to stop icing, let’s tackle the most common pitfalls that can sabotage your recovery. Even a well-intentioned ice pack can do more harm than good if you ignore a few simple rules.
Mistake 1: Icing for Too Long
Leaving an ice pack on for more than 20 minutes doesn’t speed up healing. It invites trouble. After about 20 minutes, your body triggers a protective reflex called the hunting response. Blood vessels that constricted from the cold suddenly dilate, flooding the area with warm blood.
This can actually increase swelling and in extreme cases, cause skin or nerve damage. The CBAN method gives you a built-in timer remove the pack the moment the aching sensation fades into numbness. That’s your signal to stop. Longer is not better.
Mistake 2: Skipping the Barrier
Placing ice directly on bare skin is a fast track to an ice burn. Even a wet ice pack, which transfers cold more aggressively needs a layer of protection. A thin, dry cloth or a single layer of towel is all it takes. It allows the cold to penetrate deep enough to calm the tissue without damaging the skin’s surface. Never use a thick towel or a folded blanket though. Too much insulation and the cold won’t reach the injured area at all.
Expert Tip: A wet ice pack cools faster but always keep a thin cloth between it and your skin.
Mistake 3: Ignoring Pain or Numbness
Your body talks to you during icing. Listen. The CBAN method describes a predictable sequence Cold then Burning then Aching and finally Numbness. You should remove the pack at the Numb stage. If you feel sharp pain, stinging or a numbness that persists long after you’ve removed the ice that’s a red flag. It could signal cold injury or nerve irritation. Stop icing immediately and let the area rewarm naturally. Don’t rub it and don’t apply heat right away.
Mistake 4: Icing Before Physical Activity
It’s tempting to numb an ache before a workout or game but this is a dangerous shortcut. Ice dulls more than pain. It reduces proprioception, your joint’s sense of position, and temporarily weakens muscle power. You’re more likely to move poorly and re-injure the tissue. Save ice for after exercise, when it can manage the post-activity flare-up.
Expert Tip: Icing before activity dulls proprioception and muscle power, increasing re-injury risk. Save it for post-exercise relief.
Mistake 5: Relying Solely on Ice for Recovery
An ice cold therapy machine is a tool, not a cure. It constricts blood vessels and numbs pain but it doesn’t rebuild torn fibers or restore strength. Real healing demands more. Gentle, pain-free movement (optimal loading) guides new tissue alignment. Quality sleep and protein-rich nutrition supply the raw materials for repair. If you ice religiously but skip these pillars, you’re just managing symptoms while the injury stalls.
Expert Tip: Ice alone won’t heal pair it with active recovery proper nutrition and quality sleep for optimal tissue repair.
Mistakes can sometimes lead to serious issues. Next, we’ll cover the red flags that mean it’s time to see a doctor.
When to Seek Medical Attention
While most minor injuries heal with home care, some signs demand professional help. Here’s what to watch for.
Red-Flag Symptoms That Require a Doctor’s Evaluation
If you can’t put any weight on the injured limb at all, stop self-treating and get assessed. That’s a clear signal. Severe pain that feels out of proportion to the injury or a joint that looks visibly deformed or out of place also warrants an immediate visit. These can point to a fracture, dislocation or a more serious soft-tissue tear that ice alone won’t fix.
Watch closely for signs of infection, too. If the area becomes increasingly red, hot or swollen after the first day, or if you develop a fever, don’t wait. An infection needs urgent medical care, not a cold pack. Numbness, tingling or a bluish-white skin color that persists after you remove the ice is another red flag: it may signal nerve or circulation damage.
Special Considerations: Diabetes, Circulatory Issues and Other Conditions
Ice therapy isn’t for everyone. If you have diabetes, peripheral neuropathy, Raynaud’s disease or any condition that reduces sensation or blood flow, talk to your healthcare provider before applying ice. Reduced sensation means you might not feel the normal cold, burning or aching stages. You could easily over-ice and cause frostbite or nerve injury without realizing it. Similarly, poor circulation can make it harder for tissues to rewarm safely after icing.
Expert Tip: If you have diabetes, Raynaud’s or any circulatory or sensory condition, get a doctor’s clearance before icing: you may need a safer alternative.
When in doubt, err on the side of caution. A quick call to your doctor or a visit to a physiotherapist can prevent a small problem from becoming a serious one. Trust your instincts: if something feels wrong, it probably is.
Now, let’s bust some persistent myths about ice therapy that might be holding you back.
Myth-Busting: 5 Common Ice Therapy Myths
Even with the best intentions, myths can lead you astray. Let’s set the record straight on five common ice therapy misconceptions.
Myth 1: Ice Speeds Up Healing
Ice is a powerful pain-reliever not a healer. It reduces swelling and numbs the area, which feels like progress. But that relief doesn’t mean your tissues are knitting together faster.
A 2024 critical review in the British Journal of Sports Medicine found no human evidence that ice therapy improves tissue regeneration. In fact, animal studies suggest prolonged icing may delay muscle healing.
So use ice to manage the first 48 hours of discomfort. Just don’t expect it to shorten your recovery.
Myth 2: Longer Icing Is Better
More ice does not equal more benefit. The sweet spot is short, intermittent sessions, typically no more than 20 minutes, with a cloth barrier between the ice pack and your skin. Going longer risks nerve damage or frostbite. The CBAN method (Cold, Burning, Aching, Numb) is your built-in timer. You’ll feel cold, then a burning sensation, then a deep ache. The moment you feel numbness, stop. That’s your signal to remove the ice. Pushing past numbness doesn’t help; it harms.
Expert Tip: Pair ice with gentle compression and elevation for better swelling control than ice alone.
Myth 3: Ice Is Always Better Than Heat
Ice and heat are tools for different jobs. Ice constricts blood vessels and calms acute inflammation making it ideal for a fresh sprain or strain. Heat opens blood vessels and relaxes stiff muscles, which is better for chronic tightness or a knot that’s been bothering you for weeks.
After the first 48 hours, your injury enters the subacute phase. That’s when you can switch to heat to promote blood flow and support healing. If you’re unsure, ask yourself: is this a new, swollen injury? Use ice. Is it an old, stiff ache? Reach for heat.
Myth 4: You Should Ice a Chronic Injury the Same Way
A chronic injury, like a nagging tendon or an arthritic joint, rarely needs cold therapy for arthritis. These conditions thrive on warmth and movement. Ice can make them feel stiffer by reducing blood flow. The exception is a flare-up, when the area suddenly becomes hot, swollen and acutely painful. In that case, a short ice session can calm the inflammation. But for day-to-day management, focus on heat, gentle optimal loading and the PEACE & LOVE protocol.
Myth 5: Ice Alone Is Enough for Recovery
Ice is just one piece of the puzzle. It won’t rebuild strength, restore range of motion or repair tissue. True recovery demands a multifaceted approach. The PEACE & LOVE framework guides you: protect the area initially then gradually load it with pain-free movement. Prioritize sleep, good nutrition and staying active within your limits. Ice can make the early days more comfortable but it’s the active recovery work that gets you back to full function.
Now that we’ve cleared up the myths, let’s give you an interactive tool to personalize your icing plan.
Interactive Icing Decision Tool
Sometimes you just want a quick answer tailored to your exact situation. Our interactive tool does exactly that. Answer a few simple questions. You’ll get a clear personalized plan for managing your injury. No guesswork needed.
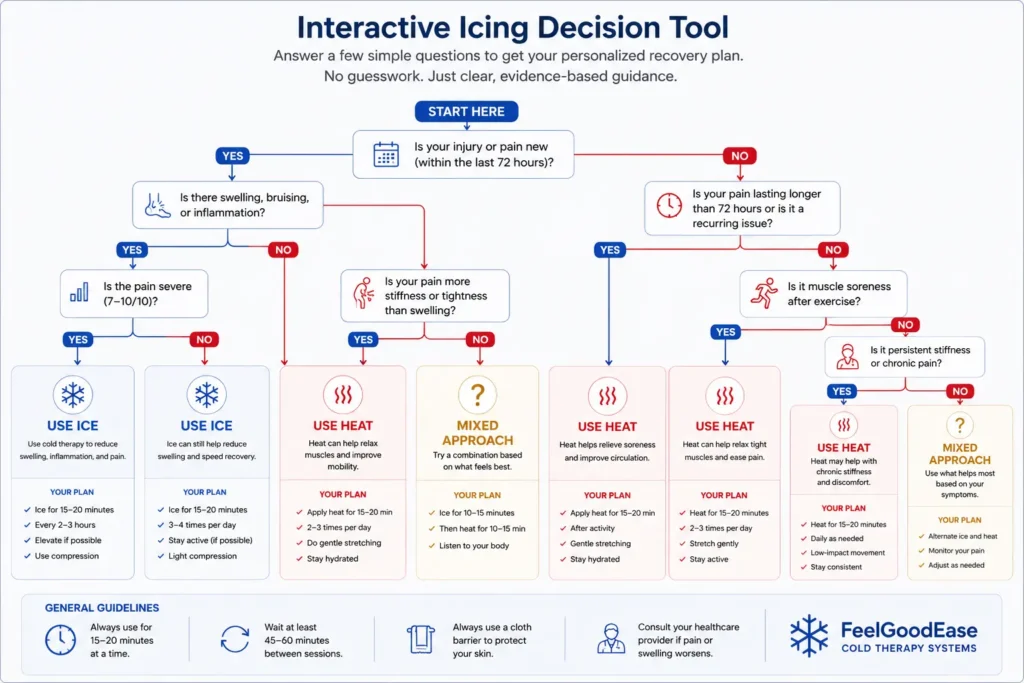
How the Tool Works: A Personalized Recommendation Flowchart
The tool walks you through three straightforward questions. First, it asks what kind of injury you have: a sprained ankle, a pulled muscle, a bruise. This helps rule out situations where icing is not appropriate like a fracture or an open wound.
Next, it asks how long ago the injury happened. The answer sorts you into the acute phase (the first 48 hours) or the subacute phase (after 48 hours). This is the critical fork in the road.
During the acute phase, the goal is to manage pain and swelling. After that the goal shifts to promoting healing through movement and warmth.
If you’re in the acute phase, the tool asks about your current symptoms. Sharp pain? Throbbing? Intense swelling? Based on your answer, it uses the CBAN method to recommend a safe icing schedule.
You’ll get a specific duration (10 to 15 minutes) and a frequency like every 2 to 3 hours. It also reminds you to always use a thin cloth barrier and to stop if the area goes numb.
If you are past the 48-hour mark, the tool steers you away from ice. It recommends transitioning to heat and optimal loading, gentle, pain-free movement that aligns with the PEACE & LOVE protocol. You might see a suggestion like, “Apply a warm compress for 15 minutes before doing your ankle circles.”
Imagine you have just rolled your ankle playing basketball. You open the tool, select “ankle sprain,” and note that it happened an hour ago. The tool classifies you as acute, asks about your pain level and then delivers a step-by-step icing schedule you can start right away. No more standing in front of the freezer wondering if you are doing it right.
Still have questions? Our FAQ section covers the most common ones.
Expert Tips for Optimal Recovery
Throughout this guide, we’ve shared expert insights. Here they are gathered for quick reference.
Expert Tip: Place a thin, dry cloth between the ice pack and your skin to prevent frostbite.
Expert Tip: Use the CBAN method: remove the ice when you reach the Numb stage (10-20 minutes).
Expert Tip: In the first 12 hours, ice for 20–30 minutes every 2–3 hours to limit secondary damage.
Expert Tip: After 48 hours, shift to gentle movement (optimal loading) as per the PEACE & LOVE protocol.
Expert Tip: Combine icing with compression and elevation for better swelling control.
Expert Tip: Avoid icing right before activity. It can reduce muscle performance and increase re-injury risk.
Expert Tip: If you have diabetes, Raynaud’s, or circulatory issues, check with a doctor before using ice.
Expert Tip: A wet ice pack (ice cubes + water) cools tissues faster and more evenly than a gel pack.
Expert Tip: Don’t rely on ice alone support healing with good nutrition, hydration and sleep.
Expert Tip: If pain or swelling gets worse after 72 hours or you can’t bear weight, get a medical evaluation.
Finally, let’s put it all together into your personalized icing plan.
Conclusion: Your Personalized Icing Plan
You’ve made it through the science, the steps and the myths. Now, here’s your simple, personalized plan. Ice is a valuable tool for cold therapy after knee surgery managing pain and swelling in the first 24-48 hours. It is not a healing accelerator. Use it wisely then move on.
Follow the CBAN method every time you ice. Apply a cold pack with a thin barrier and pay attention to the sensations. You will feel Cold first then a deep Burning, followed by an Aching sensation. Remove the pack as soon as the area feels Numb. This typically takes 10 to 15 minutes never longer. Wait at least two hours before icing again to let the tissue recover.
After the first 48 hours, your body needs a different approach. Shift from ice to gentle, pain-free movement. This optimal loading helps guide the repair process. If stiffness lingers, heat can be a welcome relief. The PEACE & LOVE protocol provides a complete framework for this active recovery phase.
Recovery is not a passive waiting game. You now have a clear, evidence-based plan to manage the early stages and then step confidently into movement. Grab the checklist, trust the process and let your body do what it does best: heal.
Frequently Asked Questions
Is It OK to Ice a Chronic Injury?
For long-standing aches like arthritis or an old tendon issue, ice is rarely the best tool. Chronic injuries usually respond better to heat, which boosts blood flow and relaxes stiff tissues.
Can I Use Frozen Vegetables Instead of an Ice Pack?
A bag of frozen peas or corn can work because it molds to the body and cools effectively. Just remember: once you’ve used it for icing, don’t refreeze it for eating. Repeated thawing and refreezing can introduce bacteria. For hygiene and to avoid waste, it’s better to keep a dedicated ice pack in the freezer.
How Do I Know If I’m Icing Too Much?
Watch for these warning signs and stop immediately if you notice any: – Skin that stays pale or white after you remove the pack – Persistent numbness or tingling that doesn’t fade within a few minutes – Increased pain or a burning sensation that feels different from the normal aching stage of the CBAN method – Blisters or skin that feels hard and waxy.
